> ## Documentation Index
> Fetch the complete documentation index at: https://docs.labellerr.com/llms.txt
> Use this file to discover all available pages before exploring further.
# How to Connect AWS S3 with Labellerr
> Learn how to establish a secure connection between your Amazon S3 bucket and Labellerr using IAM User Access for data import and export.
Welcome to the User Guide for connecting an Amazon S3 bucket with LABELLERR, a powerful SaaS product for data annotation and labeling. In this guide, we will walk you through the process of establishing a connection between your S3 bucket and Labellerr, leveraging IAM User Access within the same AWS account.
To establish the connection between your S3 bucket and Labellerr, we will utilize IAM User Access. IAM (Identity and Access Management) is an AWS service that enables you to manage access to your AWS resources securely. By creating an IAM user with appropriate permissions, you can grant Labellerr the necessary access to your S3 bucket while ensuring the security of your data.
Throughout this guide, we will provide step-by-step instructions, along with detailed explanations, to help you successfully configure the connection. It is assumed that you have a basic understanding of AWS services, including S3 and IAM. If you are new to AWS or require additional information on these services, we recommend referring to the AWS documentation for a more comprehensive understanding.
Please note that the procedures outlined in this guide pertain to connecting an S3 bucket and LABELLERR within the same AWS account.
## Prerequisites
* **AWS Account:** You must have an active AWS account to access and utilize the IAM service. If you don't have an account, you can sign up for one at the AWS website.
* **IAM Permissions:** Ensure that you have the necessary permissions to create IAM users and policies. You need to have IAM administrative access or consult with your AWS account administrator to grant you the required permissions.
* **IAM User Creation:** Decide on the user(s) you want to create in IAM. Consider the appropriate naming conventions and the level of access each user should have. Determine the number of users you need to create and the specific roles and permissions they require.
* **User Credentials:** Plan how you will manage the user credentials. Determine whether you will generate initial passwords for the users or require them to set their own passwords upon first login. Alternatively, you can leverage AWS Single Sign-On or other authentication mechanisms.
* **IAM Policies:** Identify the specific permissions and access levels required for each user. You can create custom policies to grant fine-grained permissions or leverage existing AWS managed policies. Define the policies that align with your security and access control requirements.
* **IAM Best Practices:** Familiarize yourself with IAM best practices, such as implementing the principle of least privilege, regularly reviewing and rotating credentials, and enabling multi-factor authentication (MFA) for added security.
Please follow the reference link for more information
## Quick Reference
### S3 URI Format
```
Format: s3://bucket-name/path/to/folder/
Example: s3://my-annotation-bucket/images/batch-001/
```
When entering the path in Labellerr UI, **remove the `s3://` prefix**. Enter only: `bucket-name/path/to/folder/`
### Required Permissions Summary
| Permission | Purpose |
| ----------------------------- | --------------------------------------- |
| `s3:GetObject` | Read files from bucket |
| `s3:ListBucket` | List bucket contents |
| `s3:GetBucketCors` (Optional) | Get CORS configuration |
| `s3:GetBucketLocation` | Get bucket region |
| `s3:PutBucketCors` (Optional) | Set CORS policy (or configure manually) |
| Permission | Purpose |
| ----------------- | ----------------------------- |
| `s3:PutObject` | Write/upload annotation files |
| `s3:DeleteObject` | Delete files if needed |
| `s3:ListBucket` | List bucket contents |
Export permissions are required **in addition** to import permissions.
**Using Google Cloud Storage instead?** See our [GCS Connection Guide](/getting-started/connect-gcs) for Google Cloud Storage setup instructions.
## CREATE IAM USER
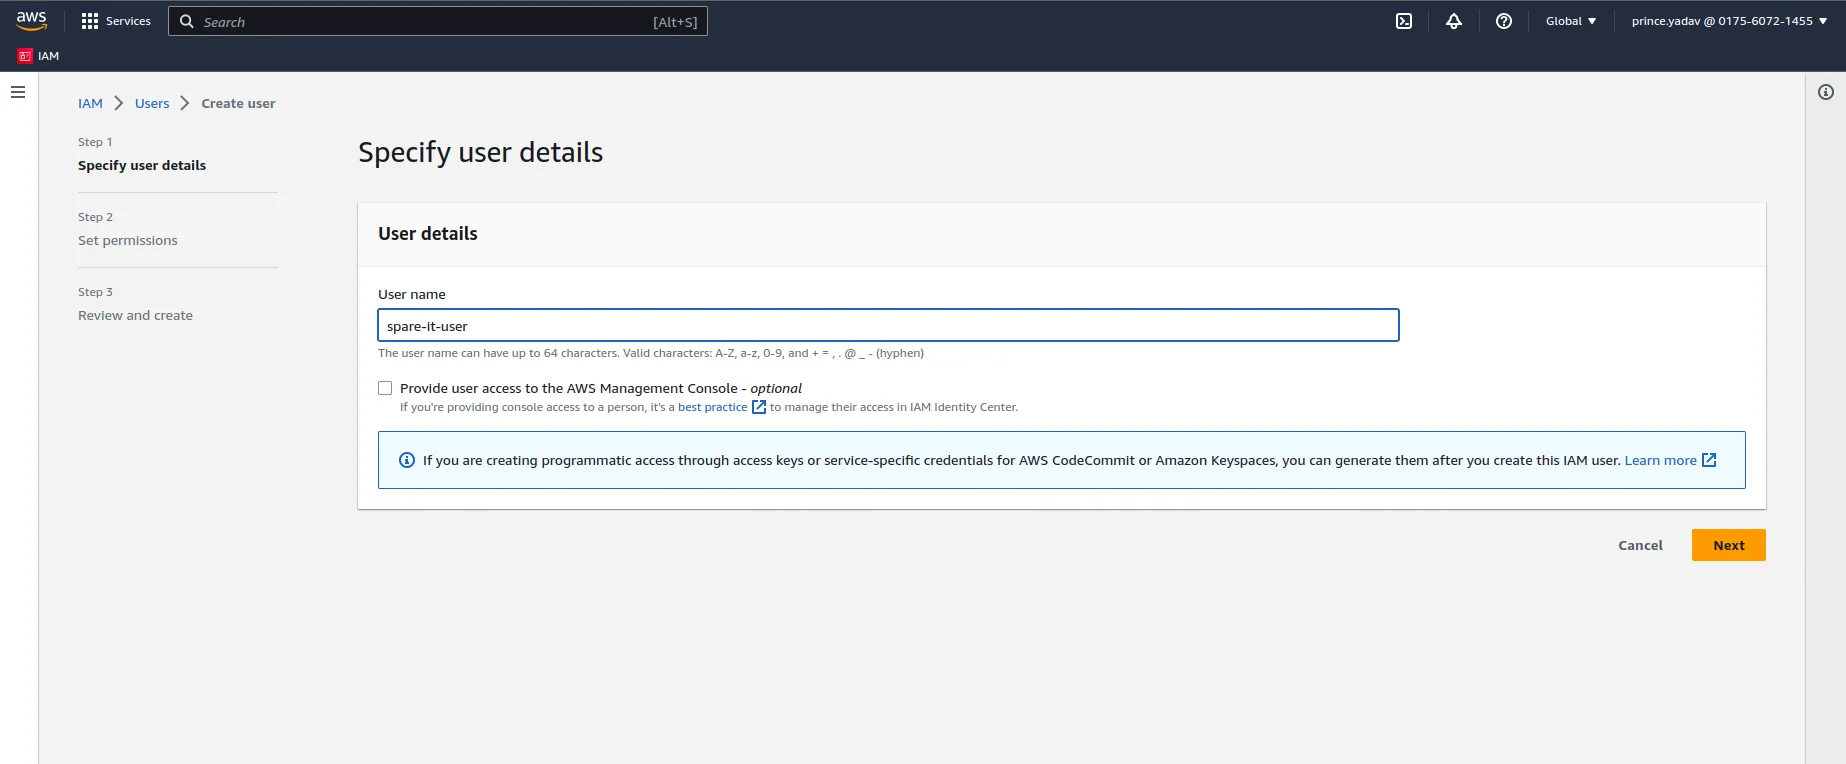
Go to **IAM** ⇒ **Users** and click to **Add users** button
 Now write a **User name** and click to **Next** button
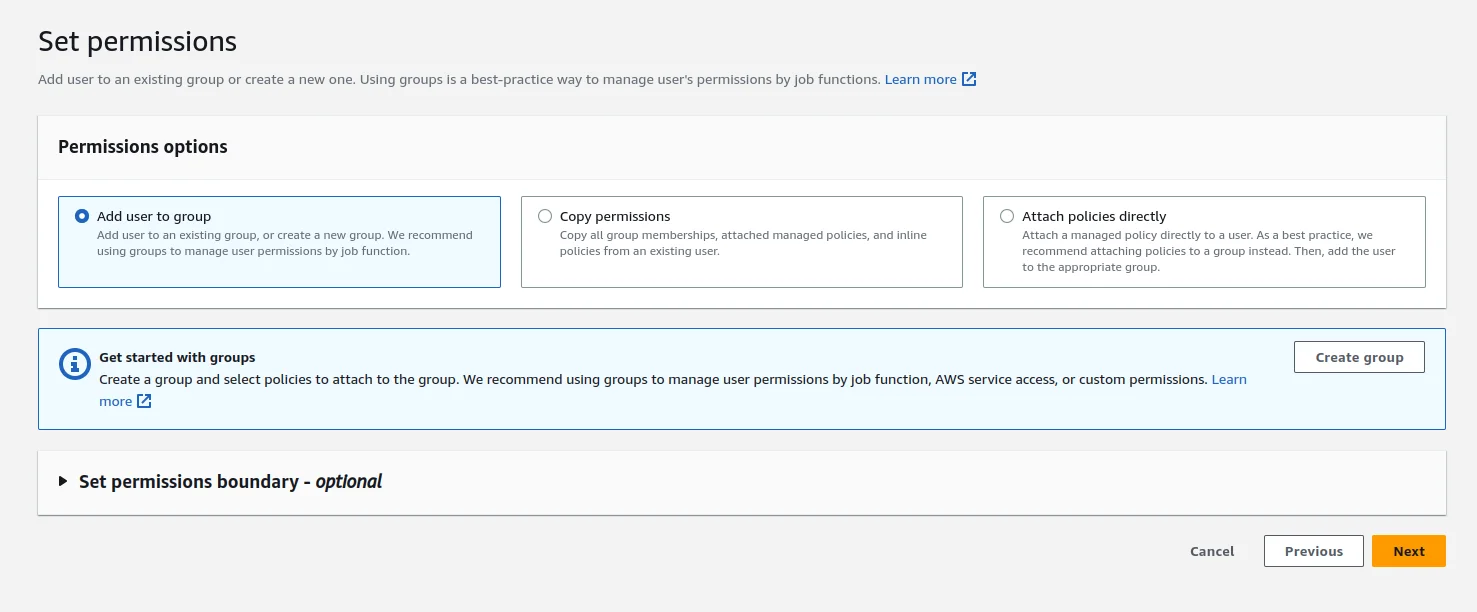
 In the **Set Permissions** section you will see the **Permissions options.** Choose **Attach Policies Directly**
 After choosing the above option you can see the list of existing policies
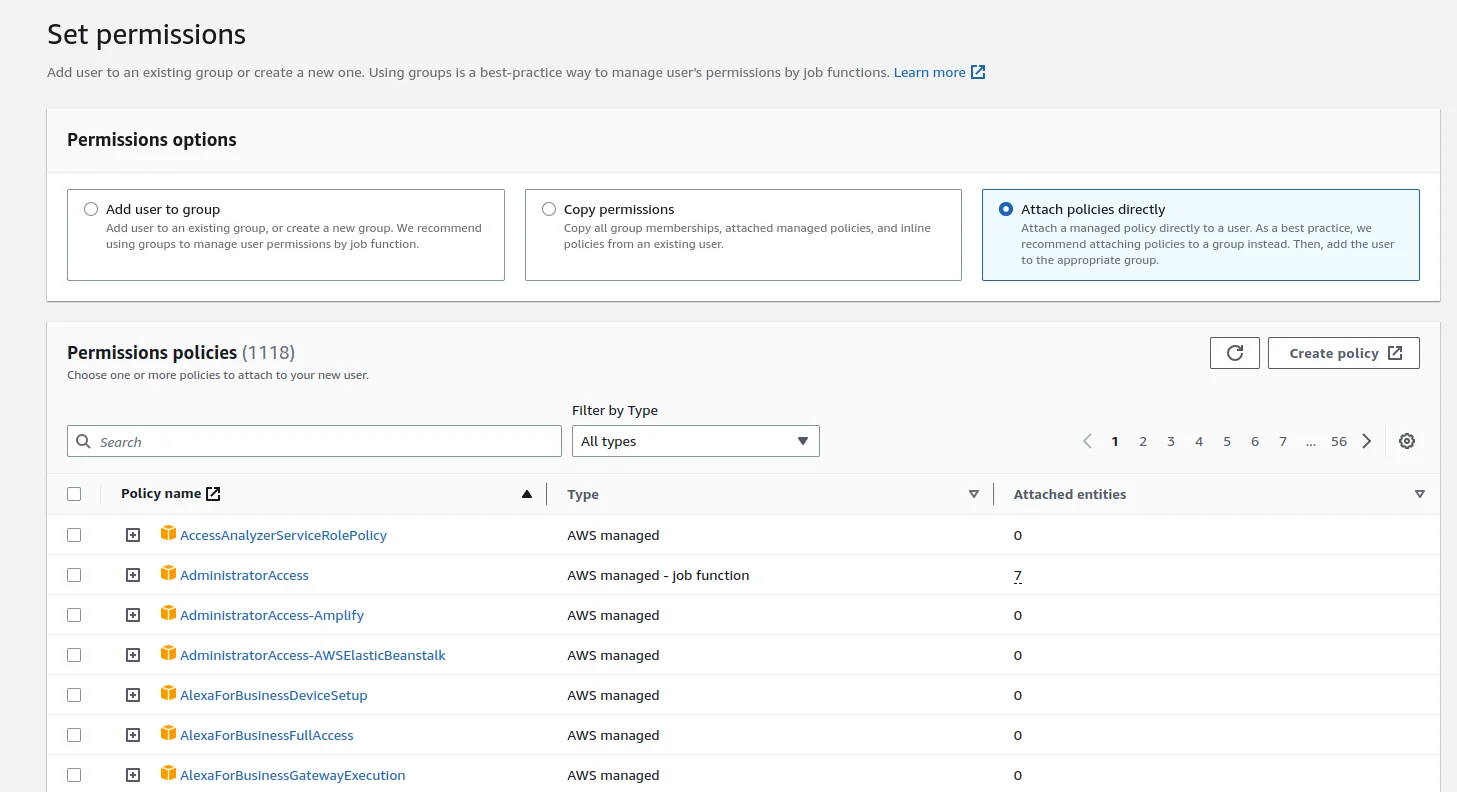 Create a new policy for the user to access the bucket. Now click on the **Create policy** button. After this you will be redirected to a window **IAM** ⇒ **Policies** ⇒ **Create Policy** as we can see following.
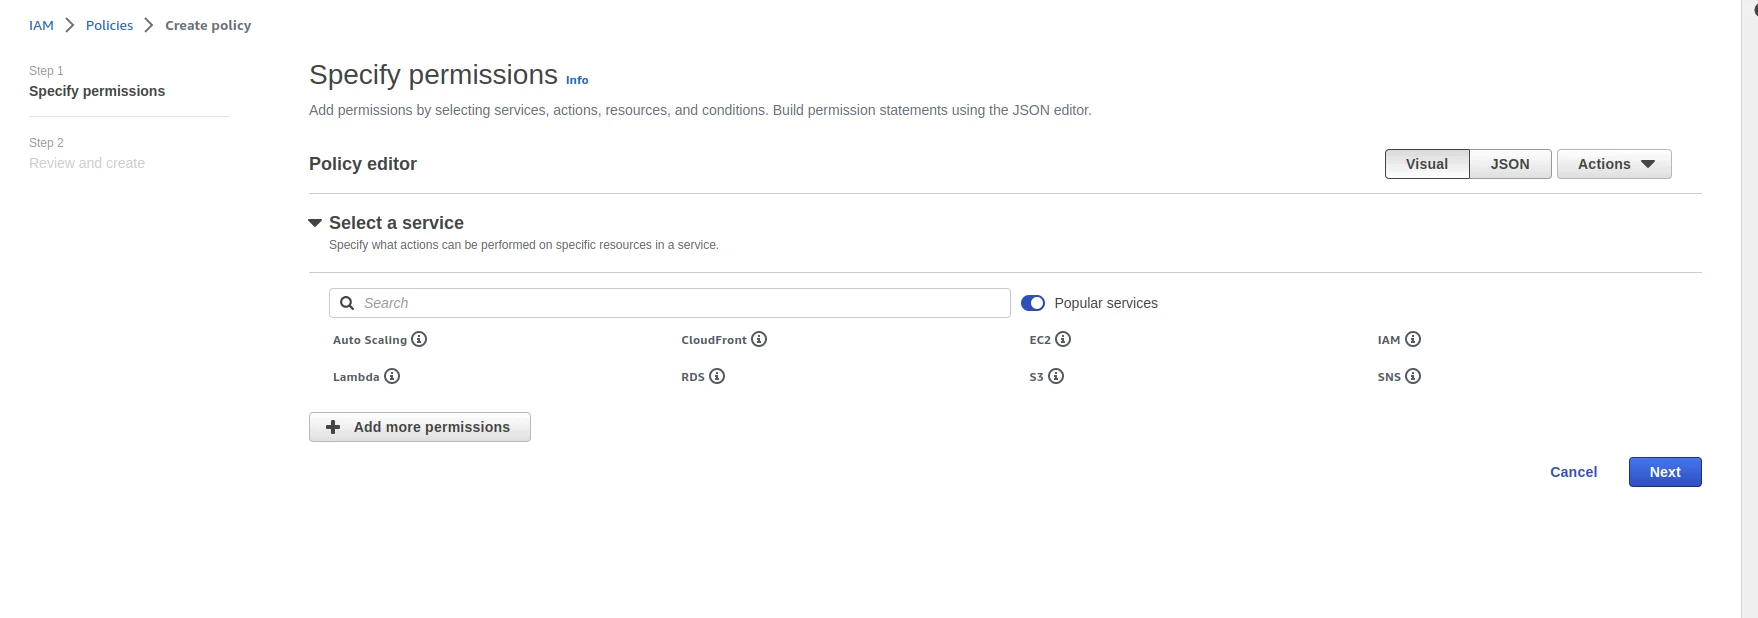 Choose the **JSON** option from the **RIGHT-HAND-SIDE** of the window. After choosing the JSON option you will see the window as follow
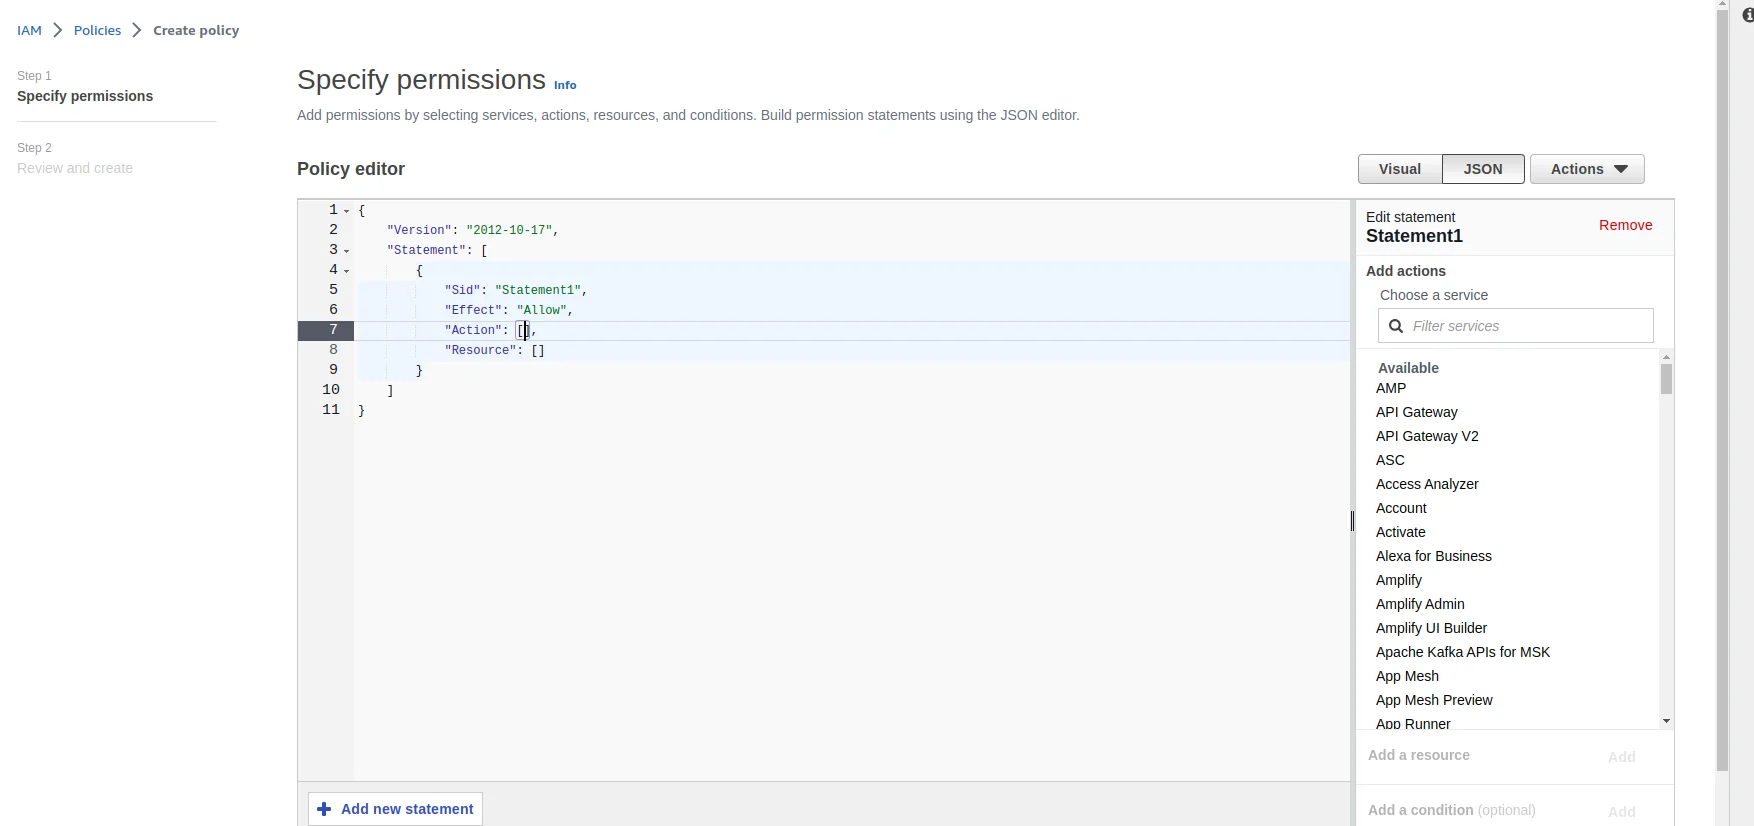 Update the JSON as follow and replace the **your-bucket-name** with **bucket-name**
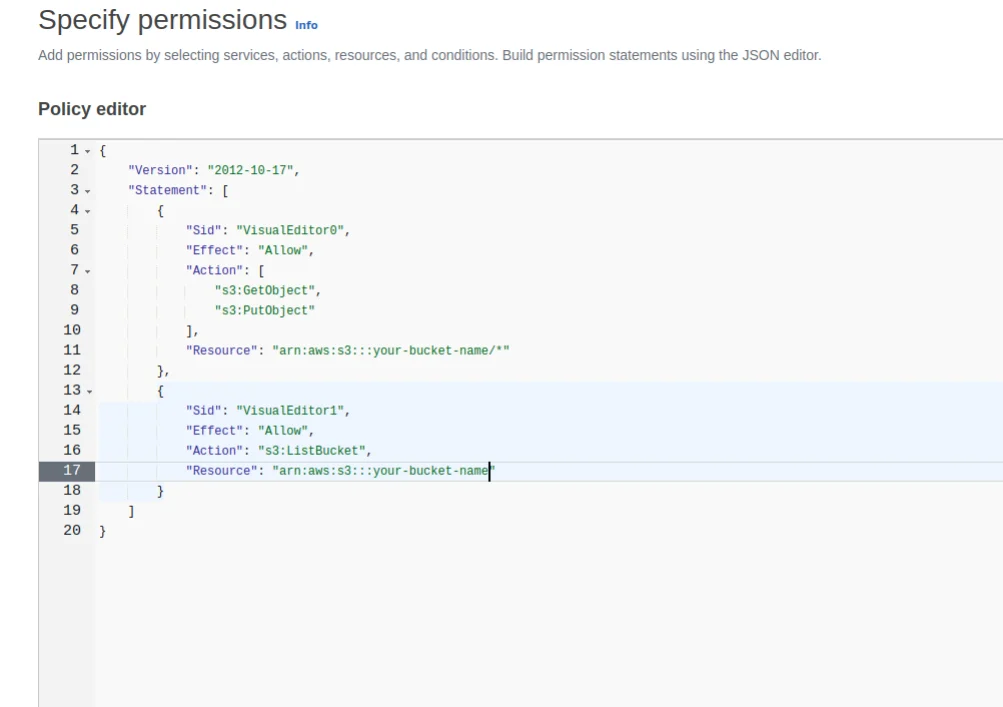 Ensure to include '*' at the end of Resource URL in case of S3:GetObject & S3:PutObject like 'arn:aws:s3:::bucket-name/*'. The '\*' ensures that the required permission is added to the sub-folders also
Now, update the JSON policy. We will create two permission sets: one for importing data from S3 and another for exporting data to S3.
## A. Policy for Importing Data
To allow Labellerr to read data from your bucket, paste the following JSON code. Replace `your-bucket-name` with the actual name of your S3 bucket.
```json theme={"dark"}
{
"Version": "2012-10-17",
"Statement": [
{
"Sid": "S3ObjectAccess",
"Effect": "Allow",
"Action": [
"s3:GetObject"
],
"Resource": "arn:aws:s3:::your-bucket-name/*"
},
{
"Sid": "S3BucketReadAccess",
"Effect": "Allow",
"Action": [
"s3:ListBucket",
"s3:GetBucketCors",
"s3:GetBucketLocation"
],
"Resource": "arn:aws:s3:::your-bucket-name"
},
{
"Sid": "S3PutCorsAccess",
"Effect": "Allow",
"Action": [
"s3:PutBucketCors"
],
"Resource": "arn:aws:s3:::your-bucket-name"
}
]
}
```
**Note:** If you prefer not to grant `s3:PutBucketCors` permission, you can set the CORS policy on your S3 bucket manually with the following configuration. For more details, refer to the official AWS documentation on CORS.
```json theme={"dark"}
[
{
"AllowedHeaders": ["*.labellerr.com"],
"AllowedMethods": ["GET", "HEAD"],
"AllowedOrigins": ["*.labellerr.com"],
"ExposeHeaders": [],
"MaxAgeSeconds": 3600
}
]
```
## B. Policy for Exporting Data
To allow Labellerr to write (export) annotations back to your S3 bucket, add the following permissions to your policy. These are required **in addition** to the import permissions above.
```json theme={"dark"}
{
"Version": "2012-10-17",
"Statement": [
{
"Sid": "S3ObjectWriteDeleteAccess",
"Effect": "Allow",
"Action": [
"s3:PutObject",
"s3:DeleteObject"
],
"Resource": "arn:aws:s3:::your-bucket-name/*"
},
{
"Sid": "S3BucketListAccess",
"Effect": "Allow",
"Action": [
"s3:ListBucket"
],
"Resource": "arn:aws:s3:::your-bucket-name"
}
]
}
```
Click on **Next** button
Ensure to include '*' at the end of Resource URL in case of S3:GetObject & S3:PutObject like 'arn:aws:s3:::bucket-name/*'. The '\*' ensures that the required permission is added to the sub-folders also
Now, update the JSON policy. We will create two permission sets: one for importing data from S3 and another for exporting data to S3.
## A. Policy for Importing Data
To allow Labellerr to read data from your bucket, paste the following JSON code. Replace `your-bucket-name` with the actual name of your S3 bucket.
```json theme={"dark"}
{
"Version": "2012-10-17",
"Statement": [
{
"Sid": "S3ObjectAccess",
"Effect": "Allow",
"Action": [
"s3:GetObject"
],
"Resource": "arn:aws:s3:::your-bucket-name/*"
},
{
"Sid": "S3BucketReadAccess",
"Effect": "Allow",
"Action": [
"s3:ListBucket",
"s3:GetBucketCors",
"s3:GetBucketLocation"
],
"Resource": "arn:aws:s3:::your-bucket-name"
},
{
"Sid": "S3PutCorsAccess",
"Effect": "Allow",
"Action": [
"s3:PutBucketCors"
],
"Resource": "arn:aws:s3:::your-bucket-name"
}
]
}
```
**Note:** If you prefer not to grant `s3:PutBucketCors` permission, you can set the CORS policy on your S3 bucket manually with the following configuration. For more details, refer to the official AWS documentation on CORS.
```json theme={"dark"}
[
{
"AllowedHeaders": ["*.labellerr.com"],
"AllowedMethods": ["GET", "HEAD"],
"AllowedOrigins": ["*.labellerr.com"],
"ExposeHeaders": [],
"MaxAgeSeconds": 3600
}
]
```
## B. Policy for Exporting Data
To allow Labellerr to write (export) annotations back to your S3 bucket, add the following permissions to your policy. These are required **in addition** to the import permissions above.
```json theme={"dark"}
{
"Version": "2012-10-17",
"Statement": [
{
"Sid": "S3ObjectWriteDeleteAccess",
"Effect": "Allow",
"Action": [
"s3:PutObject",
"s3:DeleteObject"
],
"Resource": "arn:aws:s3:::your-bucket-name/*"
},
{
"Sid": "S3BucketListAccess",
"Effect": "Allow",
"Action": [
"s3:ListBucket"
],
"Resource": "arn:aws:s3:::your-bucket-name"
}
]
}
```
Click on **Next** button
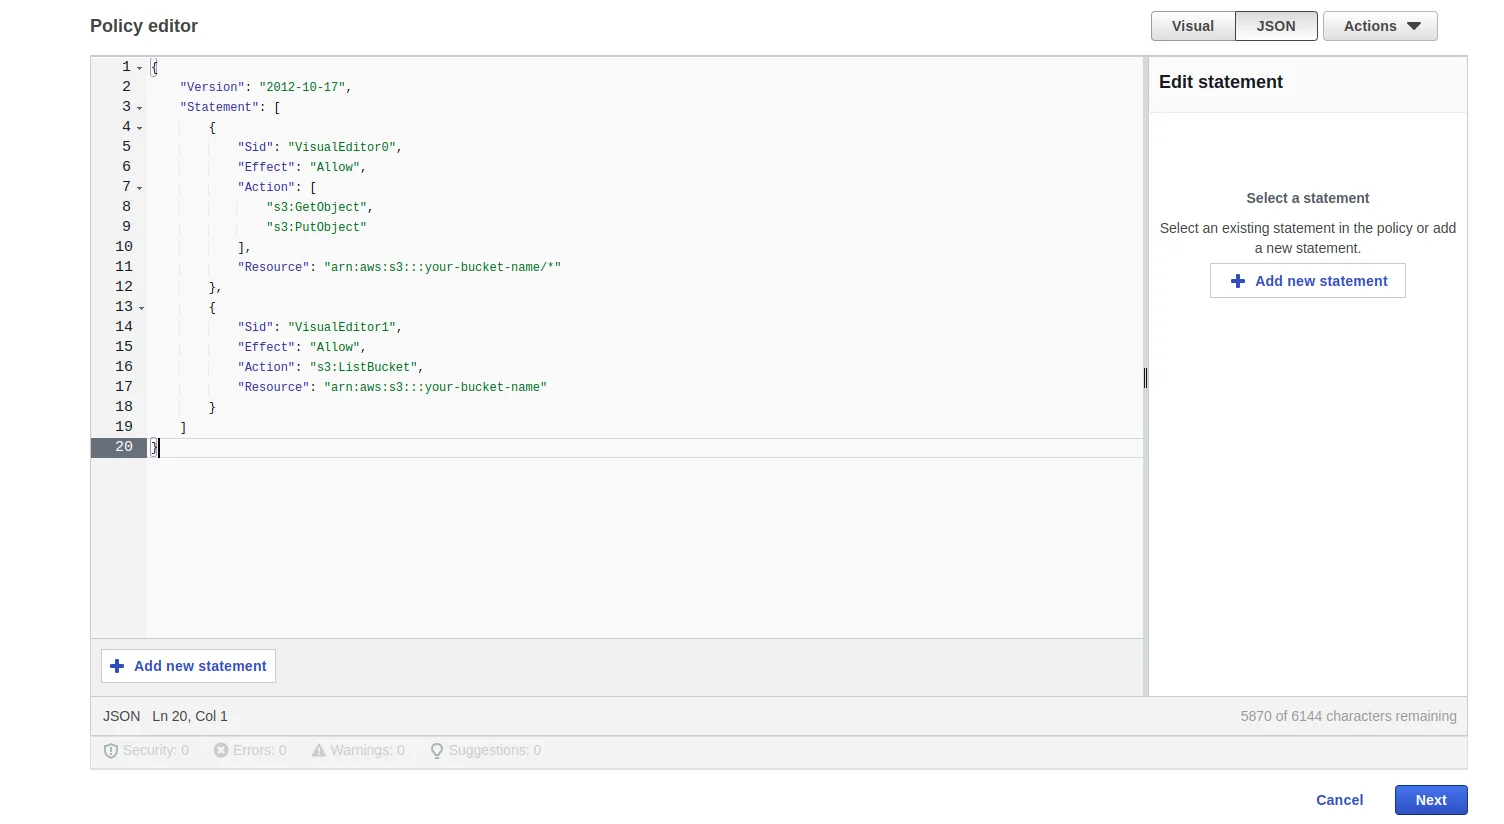 Fill the **Policy name** & **Policy Description** and click on **Create policy** button
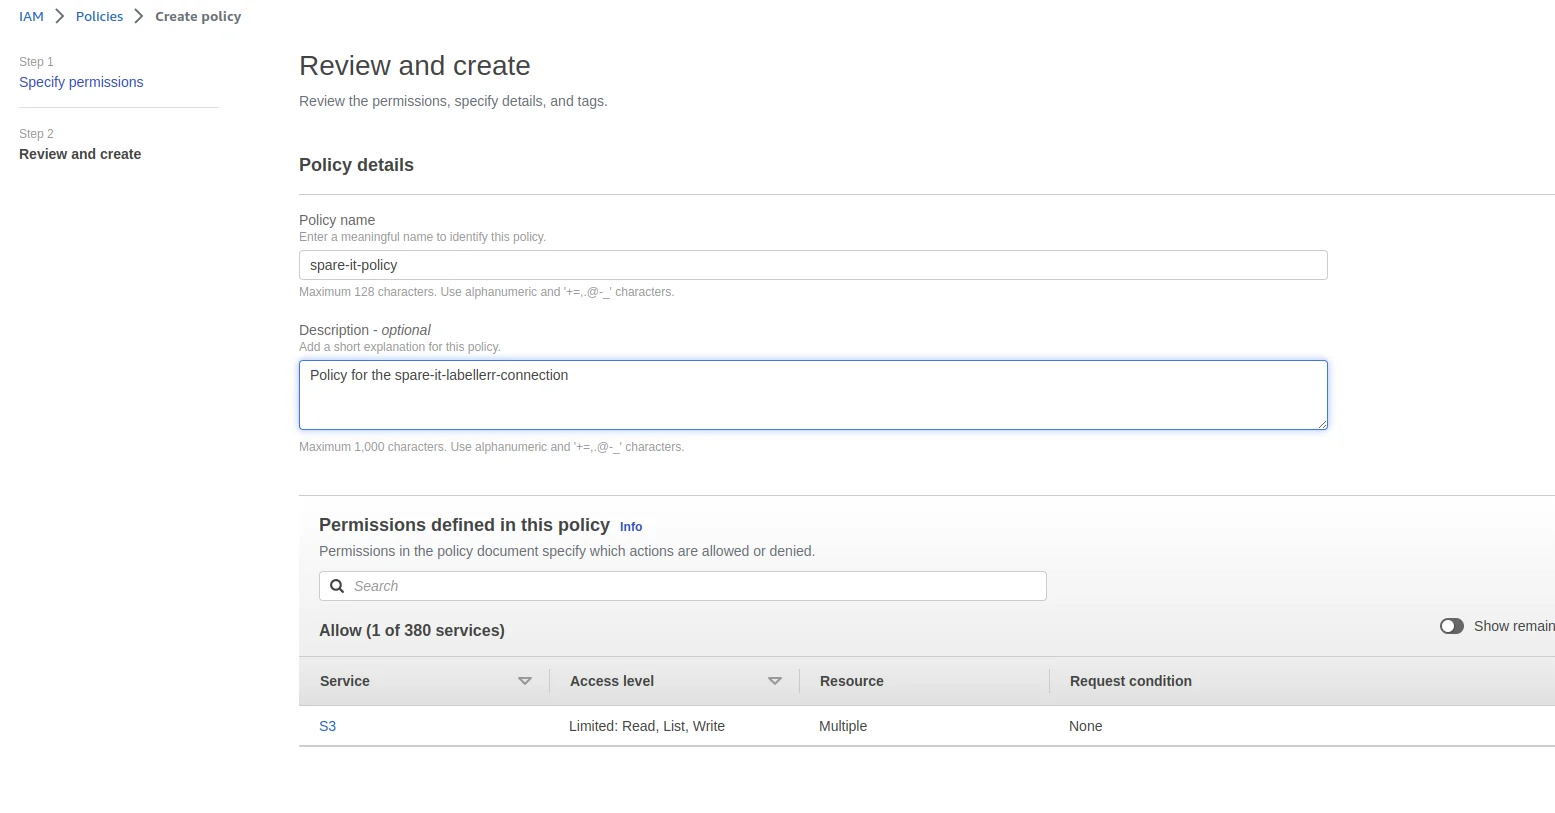
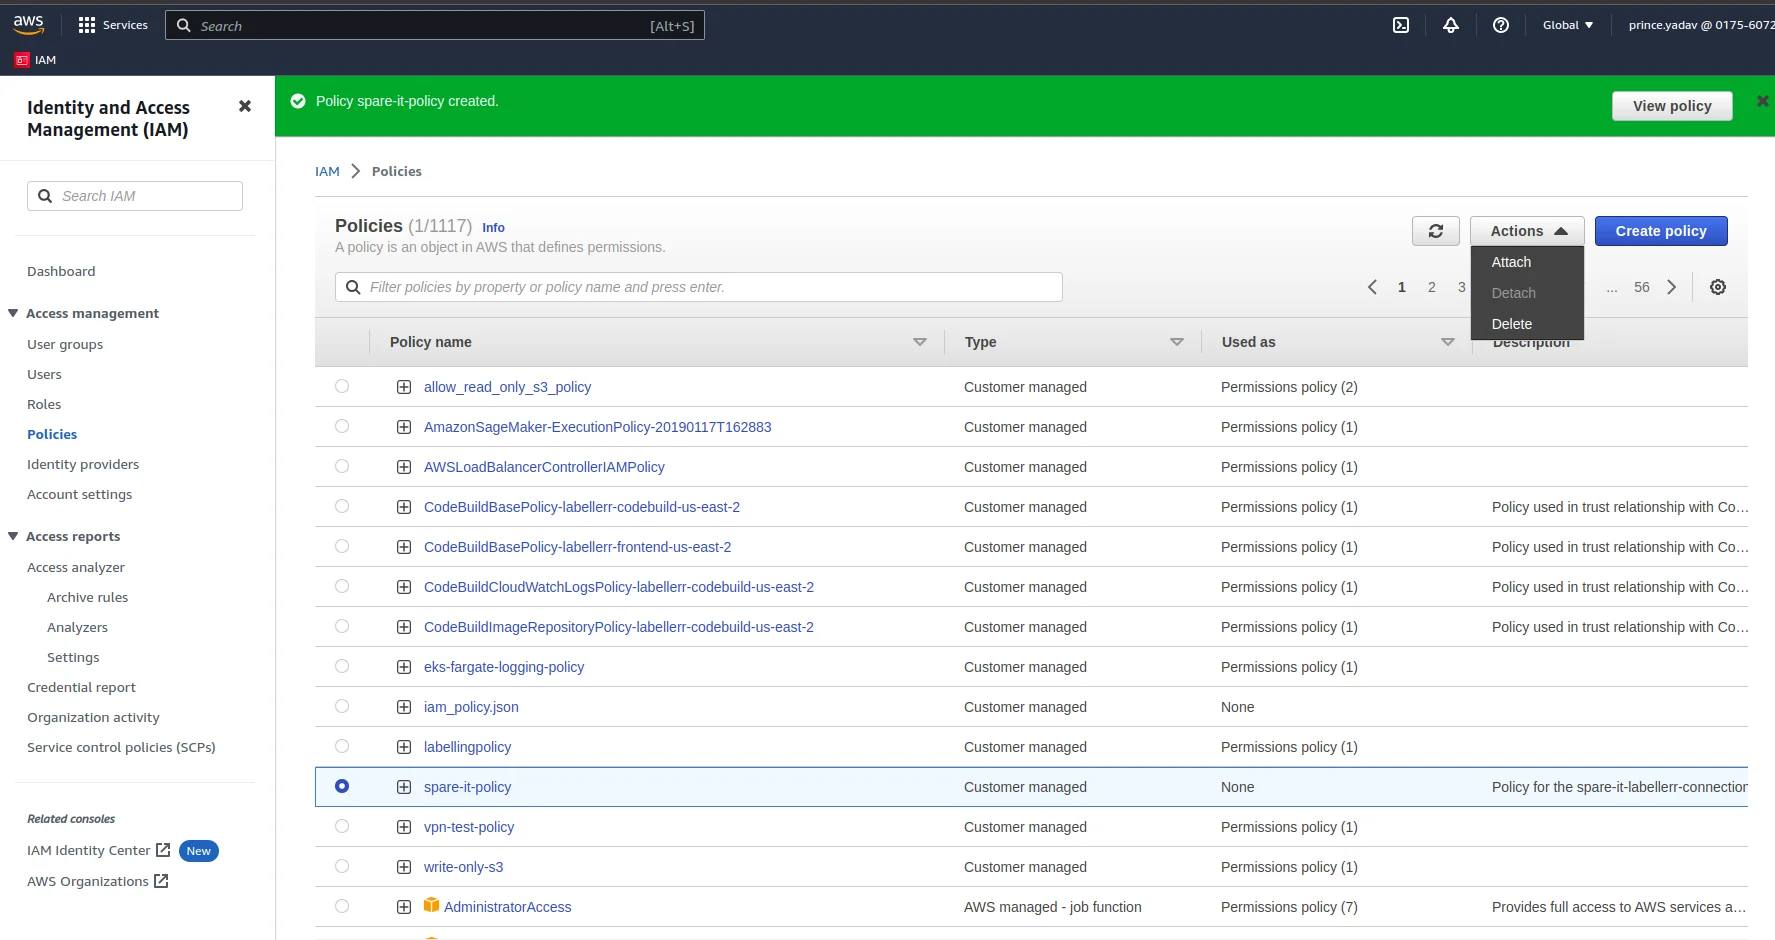
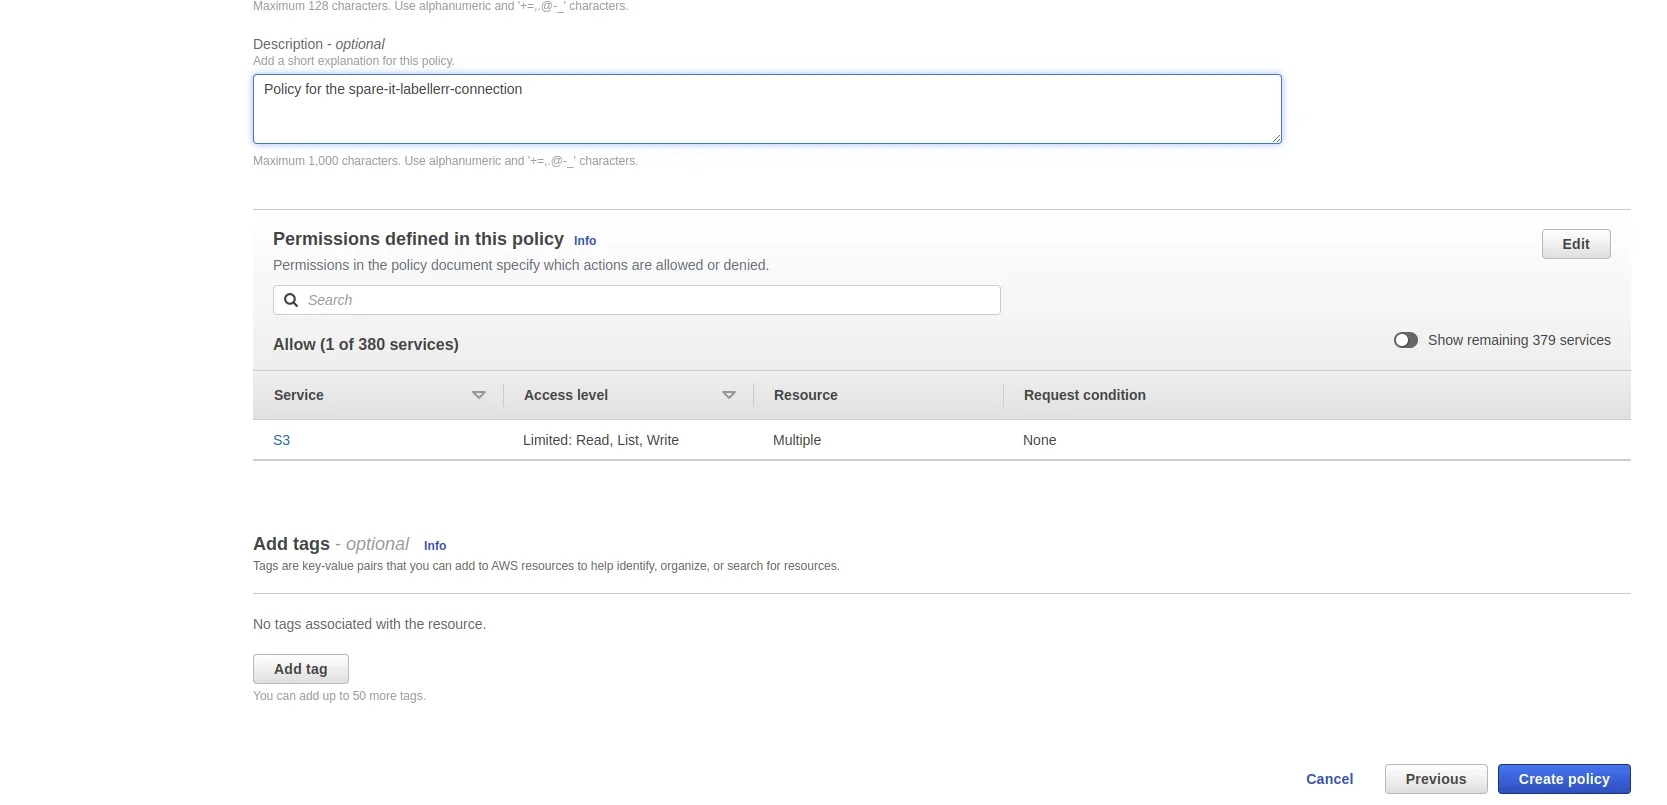 After this the policy will be created and listed
 Now go to the previous **user-creation** window and after reloading and entering the **User Name** and selecting the option **Attach policies directly** we can see the policy that we created. Choose the same policy and click on **Next** button
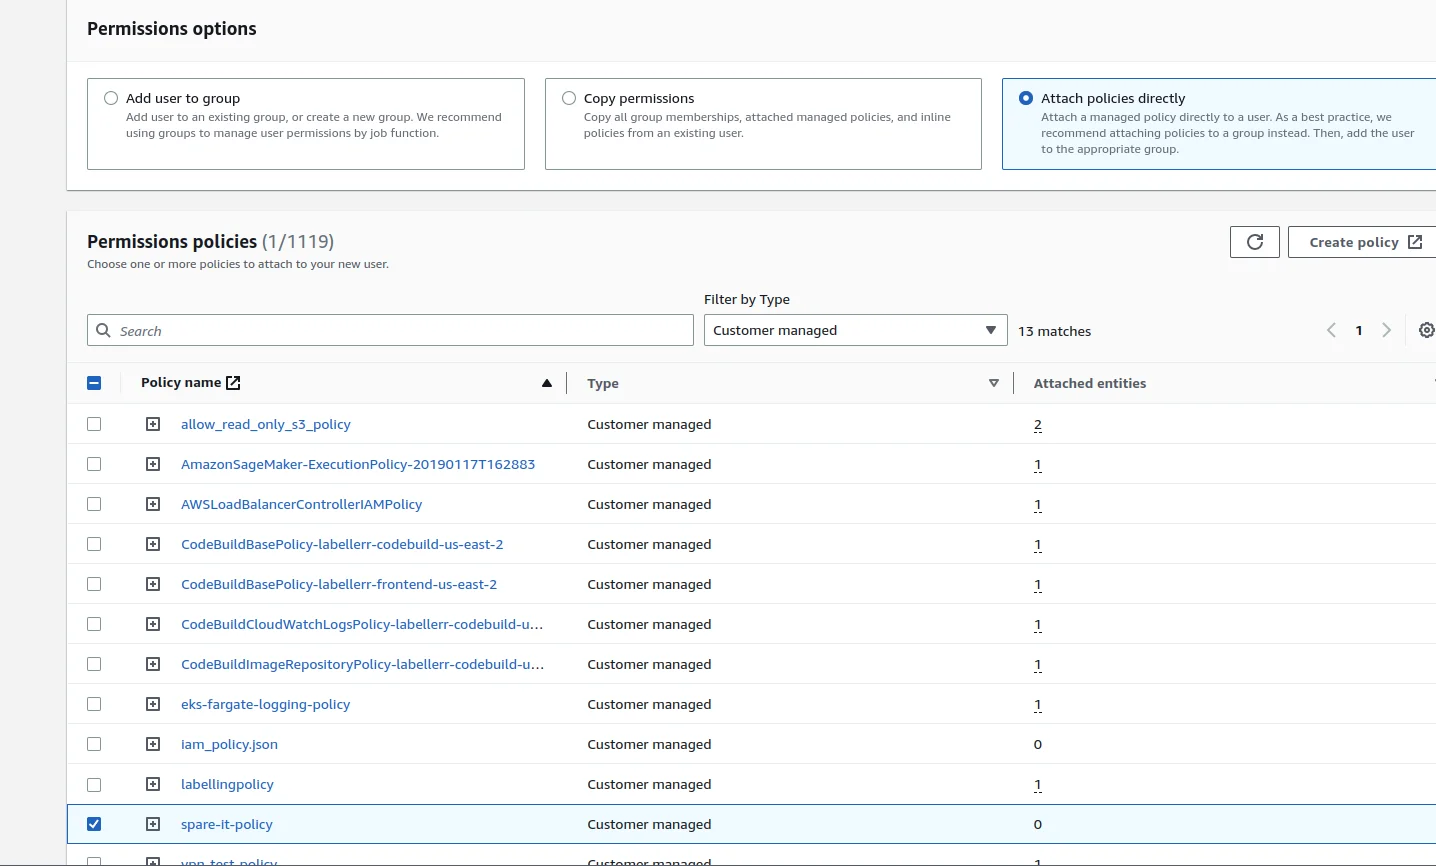
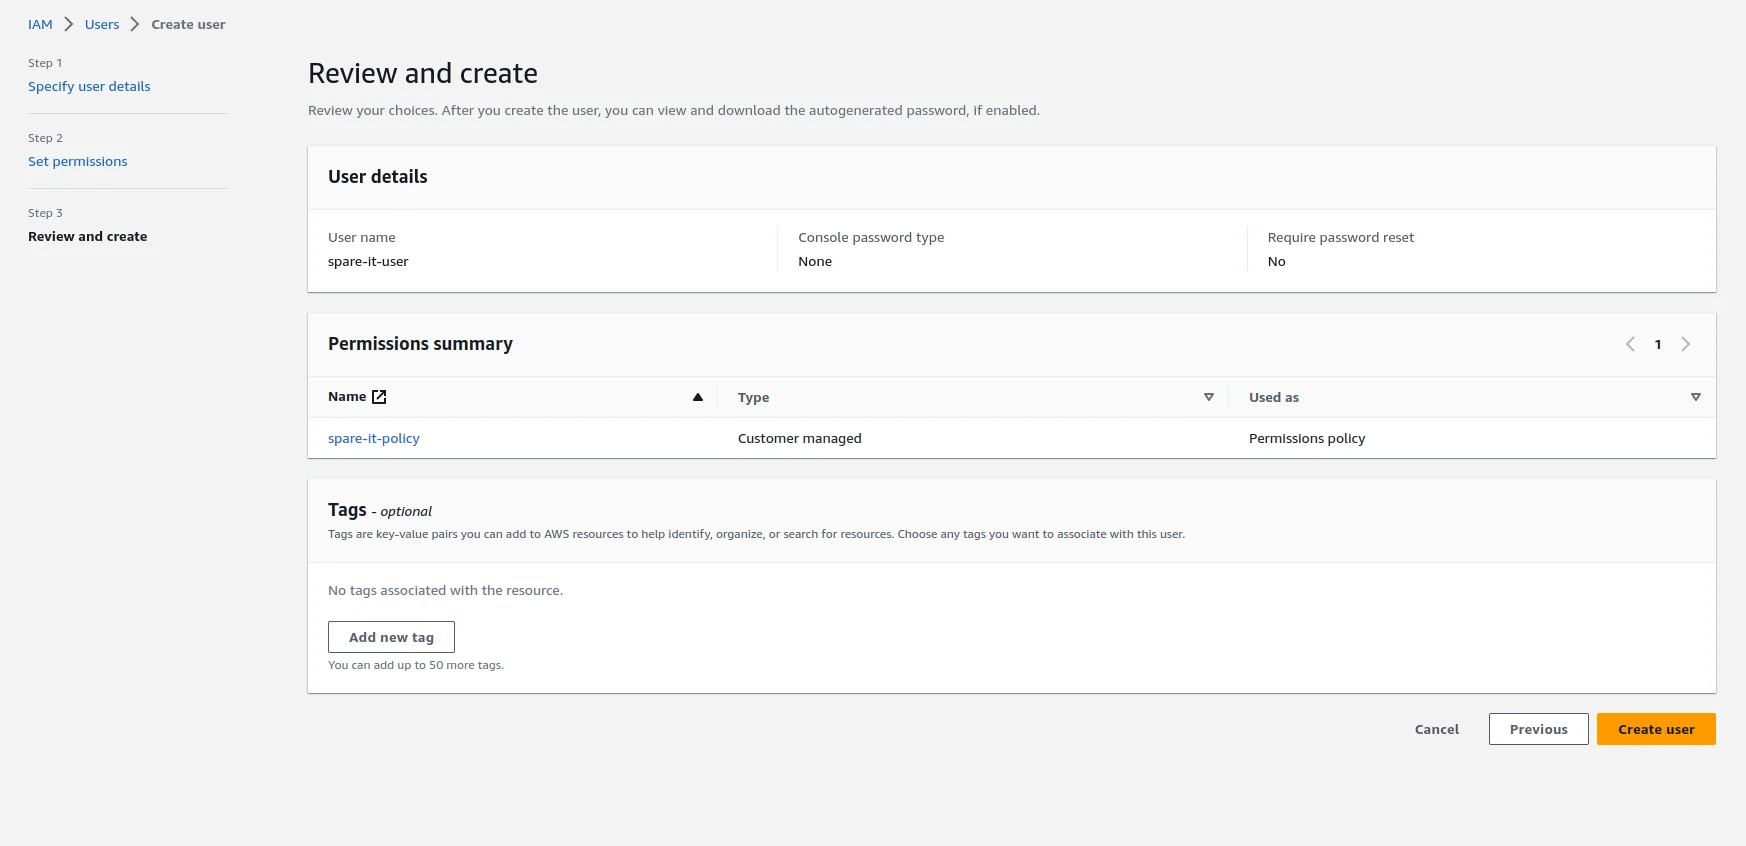
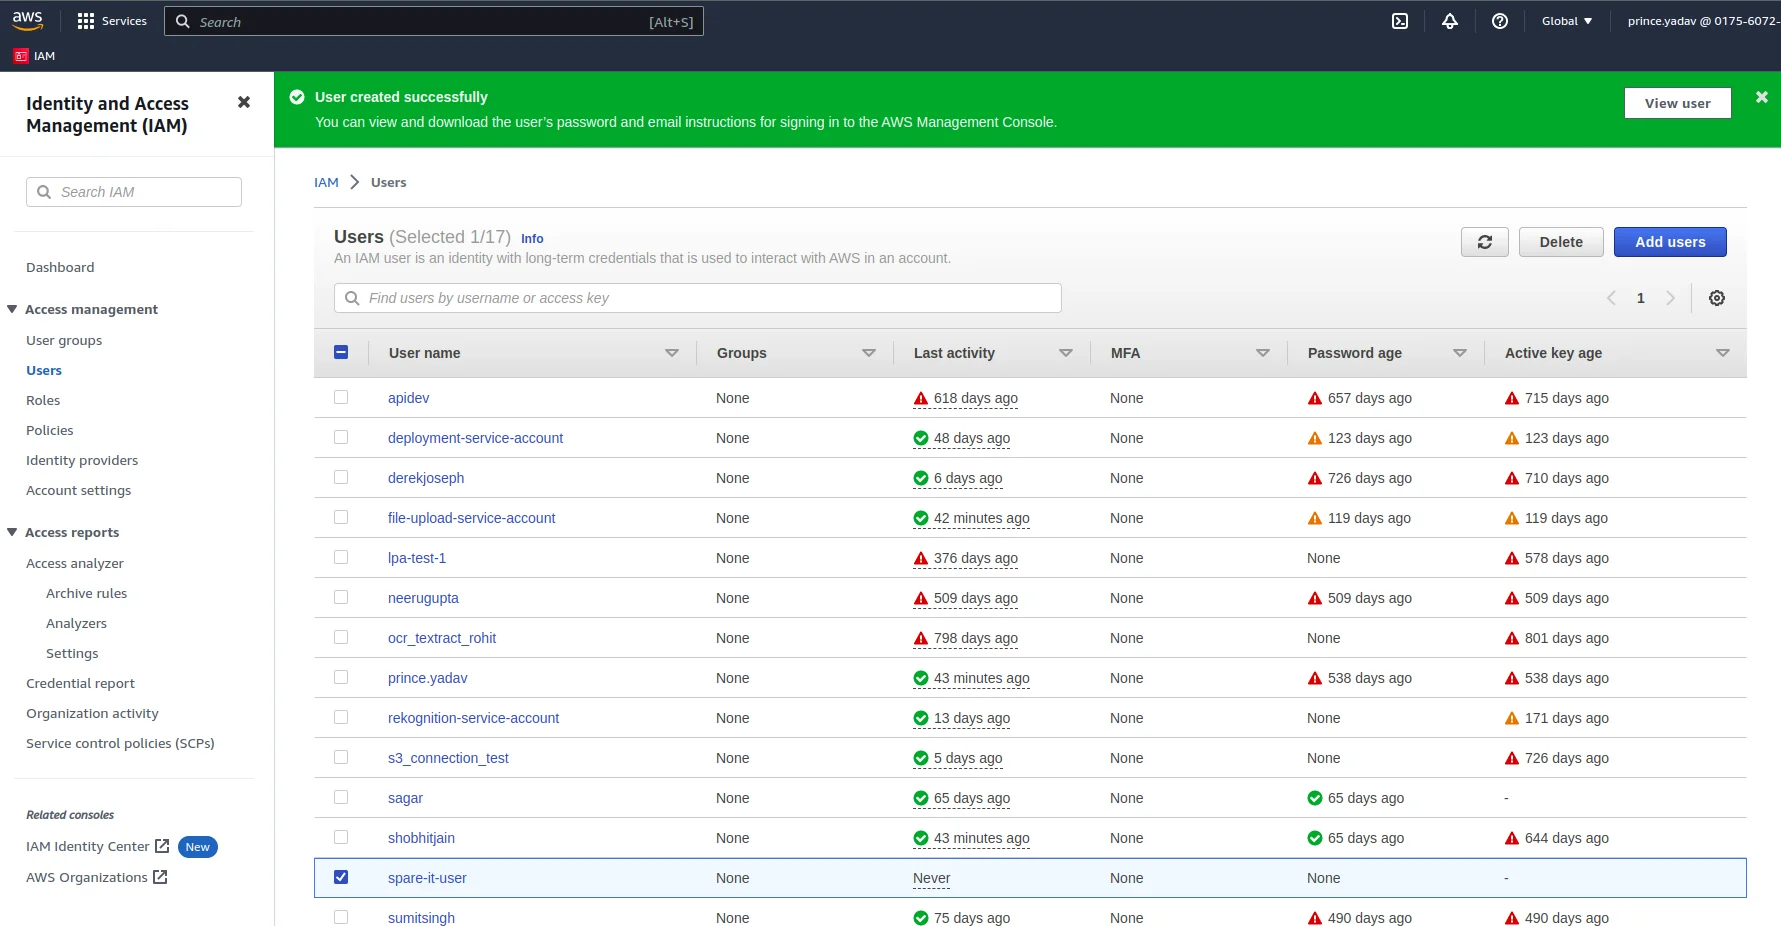
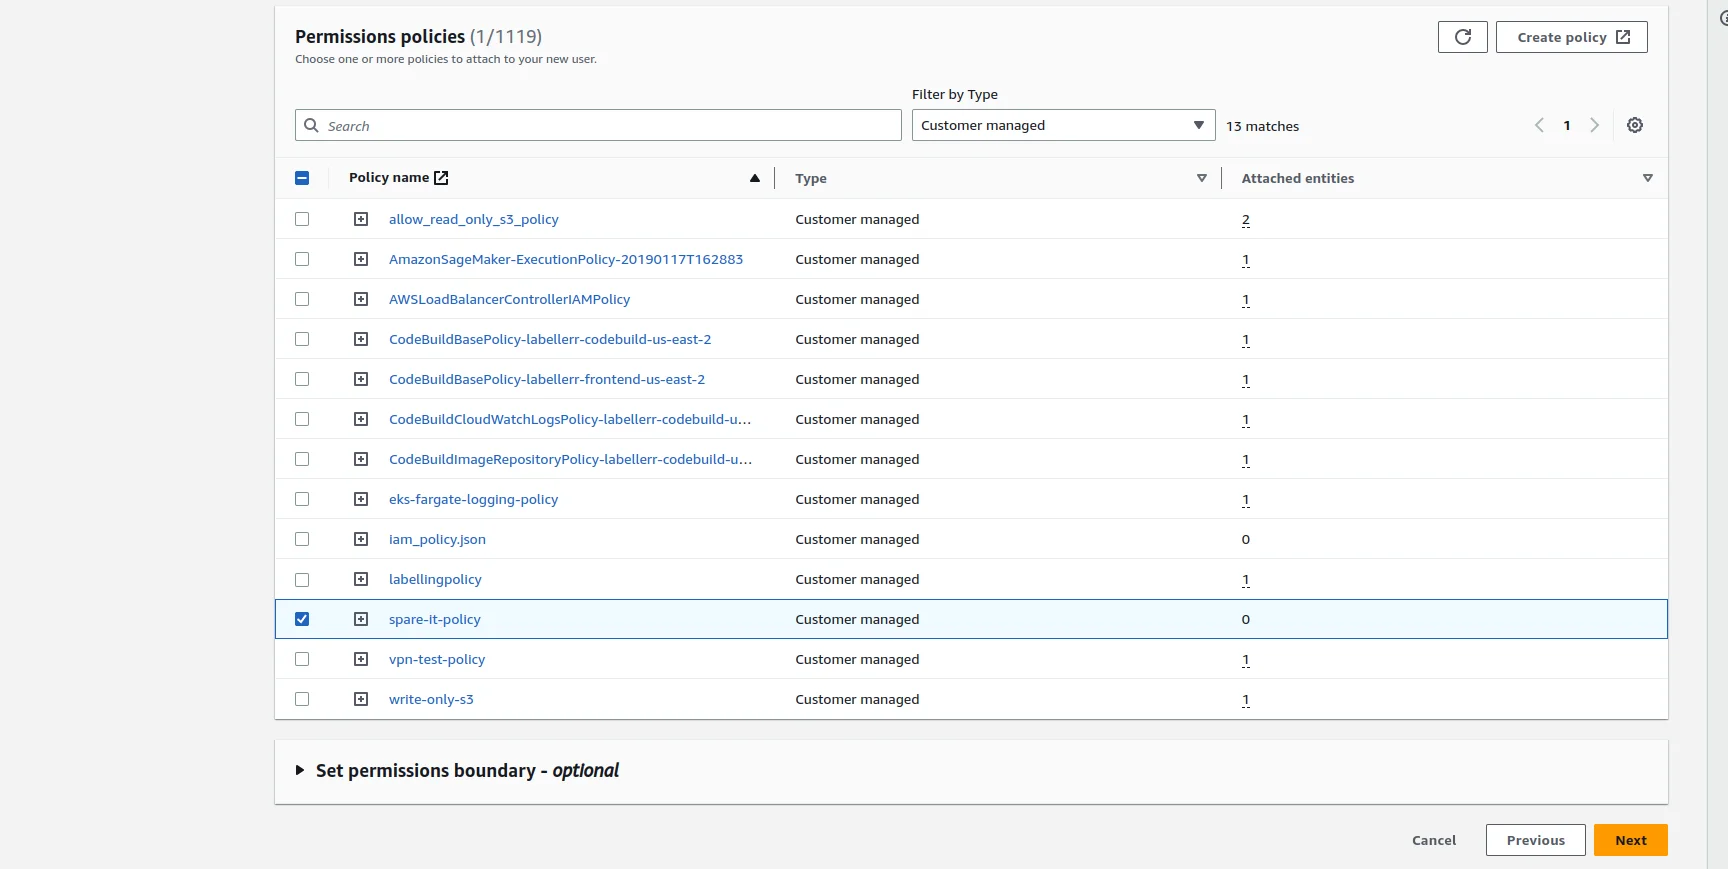 Now click on Create user button and user will be created
 ## Generate Access Key
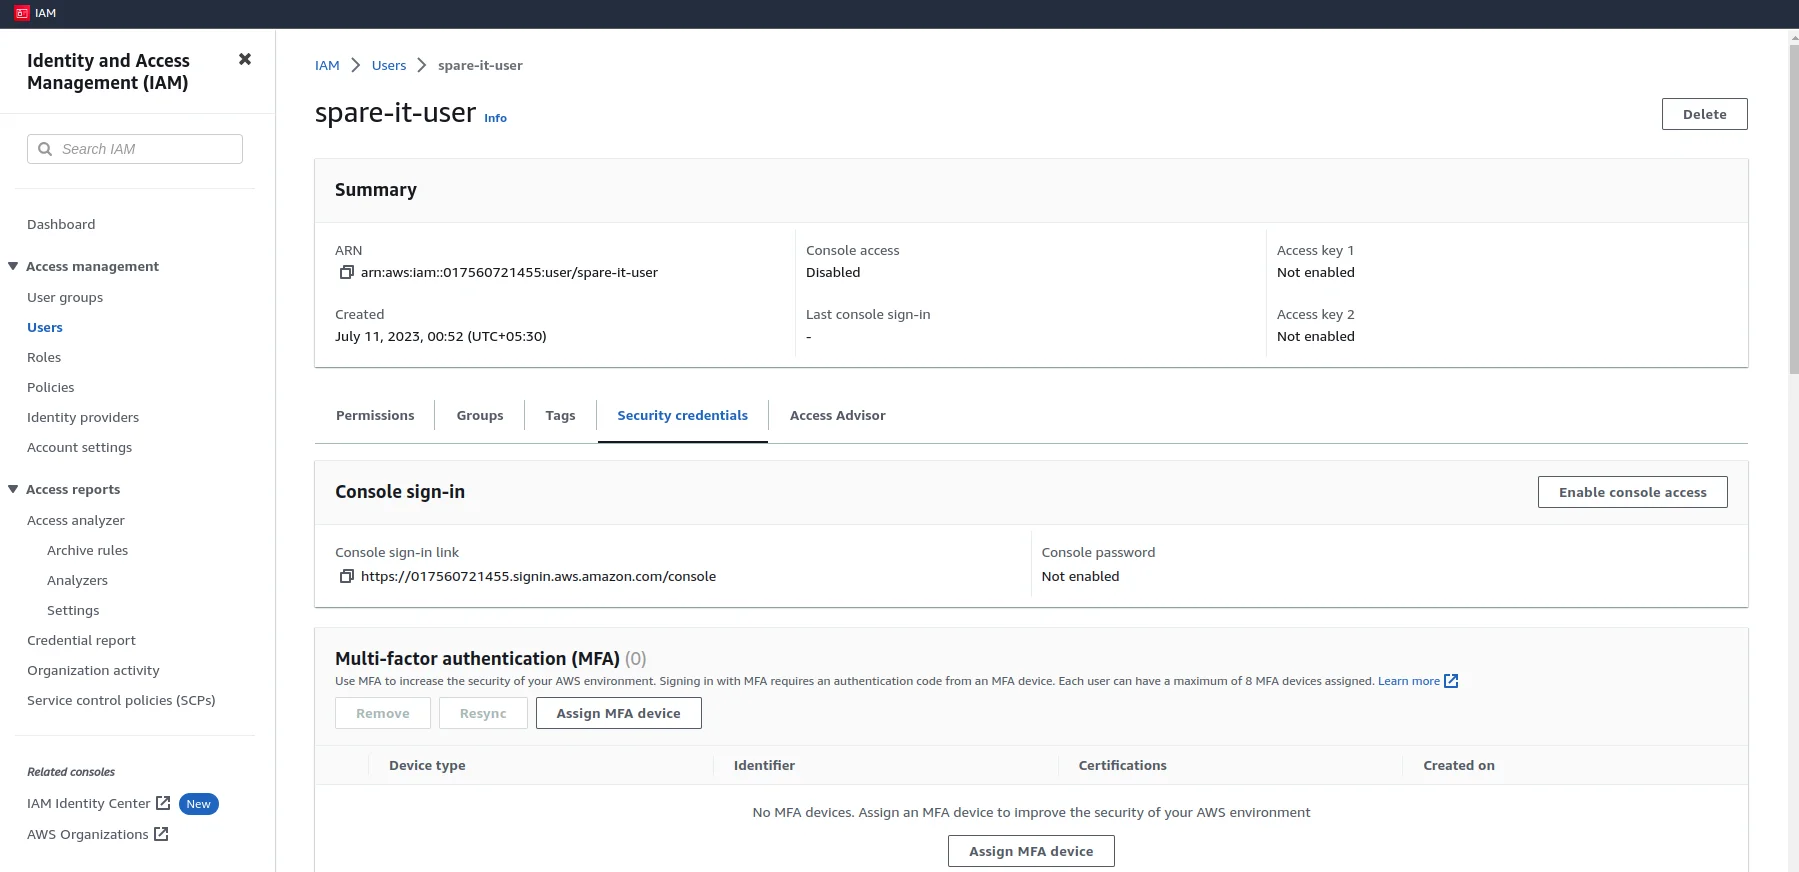
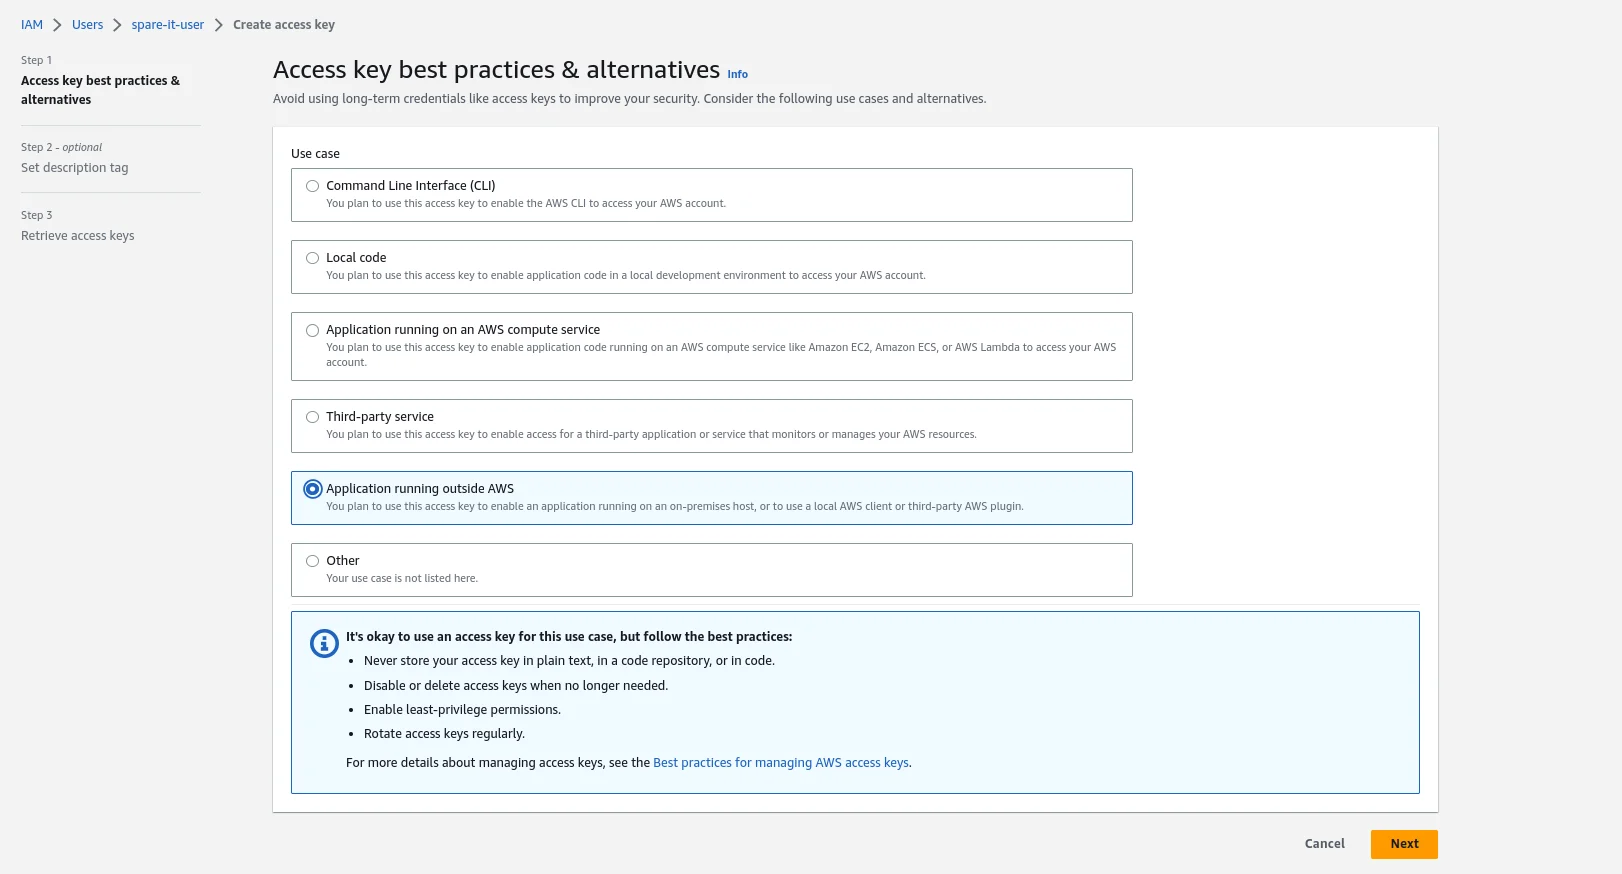
Now go to **IAM ⇒ user ⇒ user\_name** and click on **Create access** key button.
## Generate Access Key
Now go to **IAM ⇒ user ⇒ user\_name** and click on **Create access** key button.
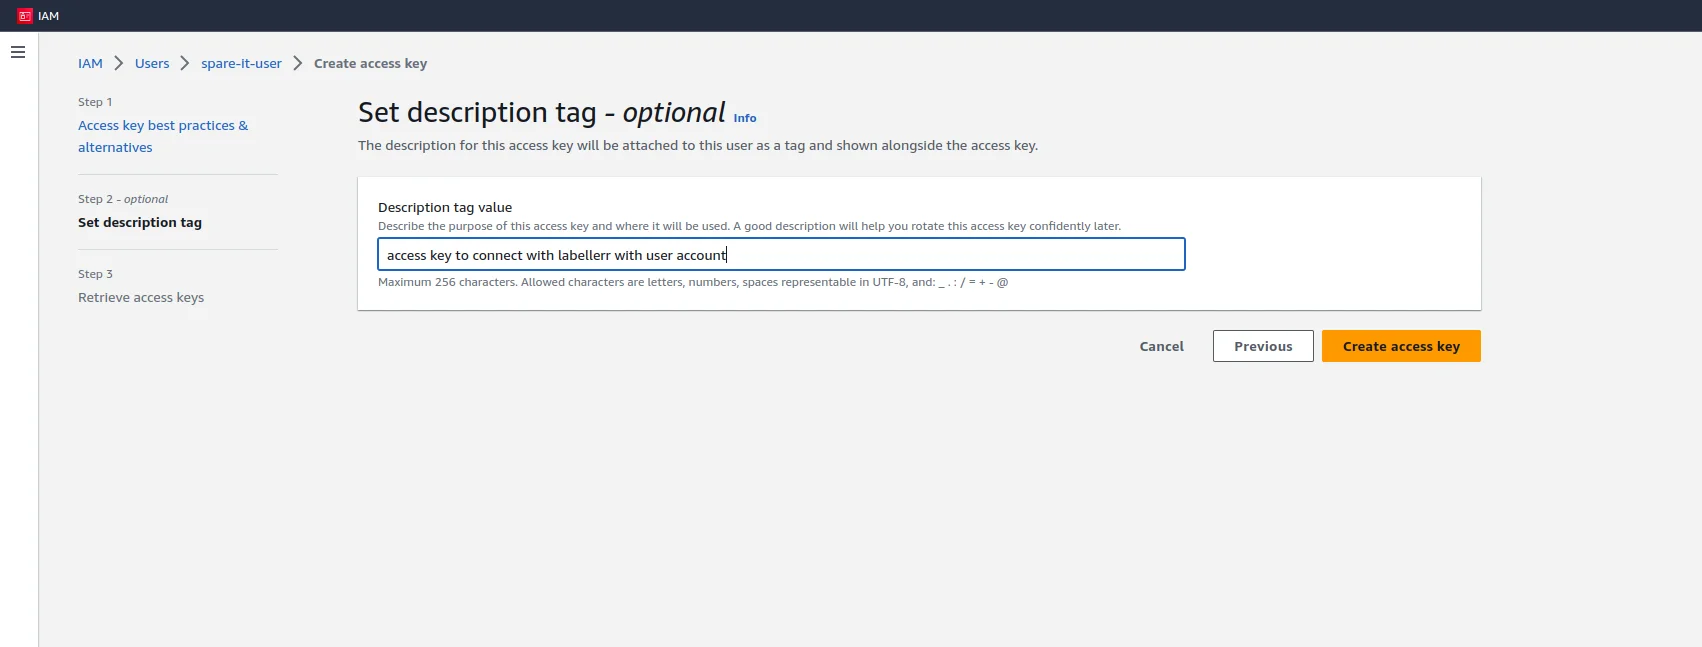
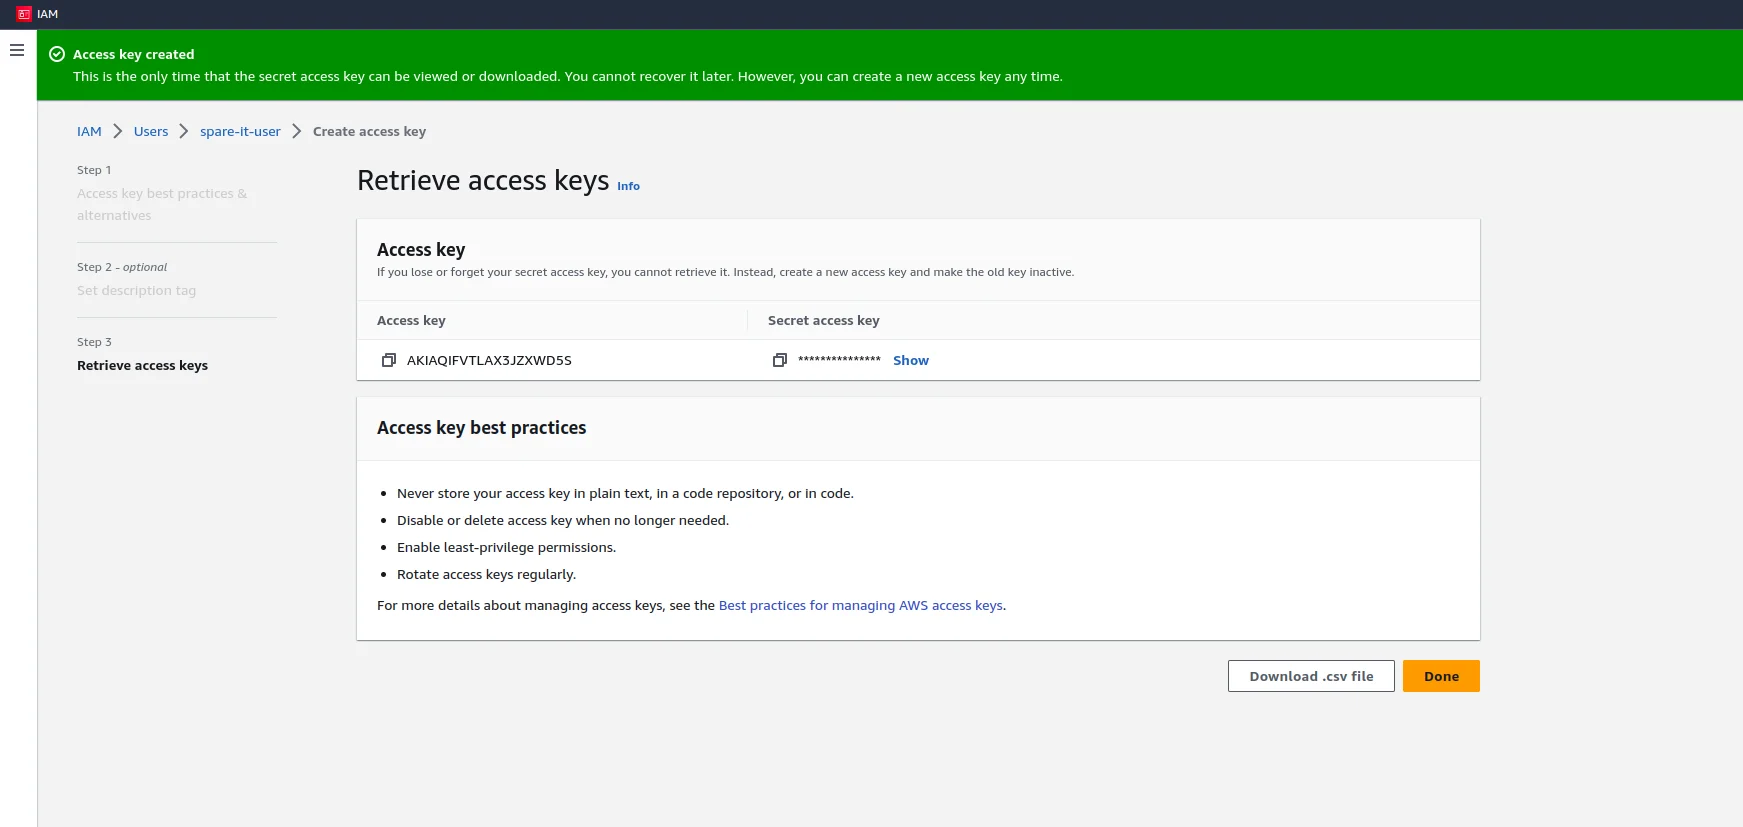
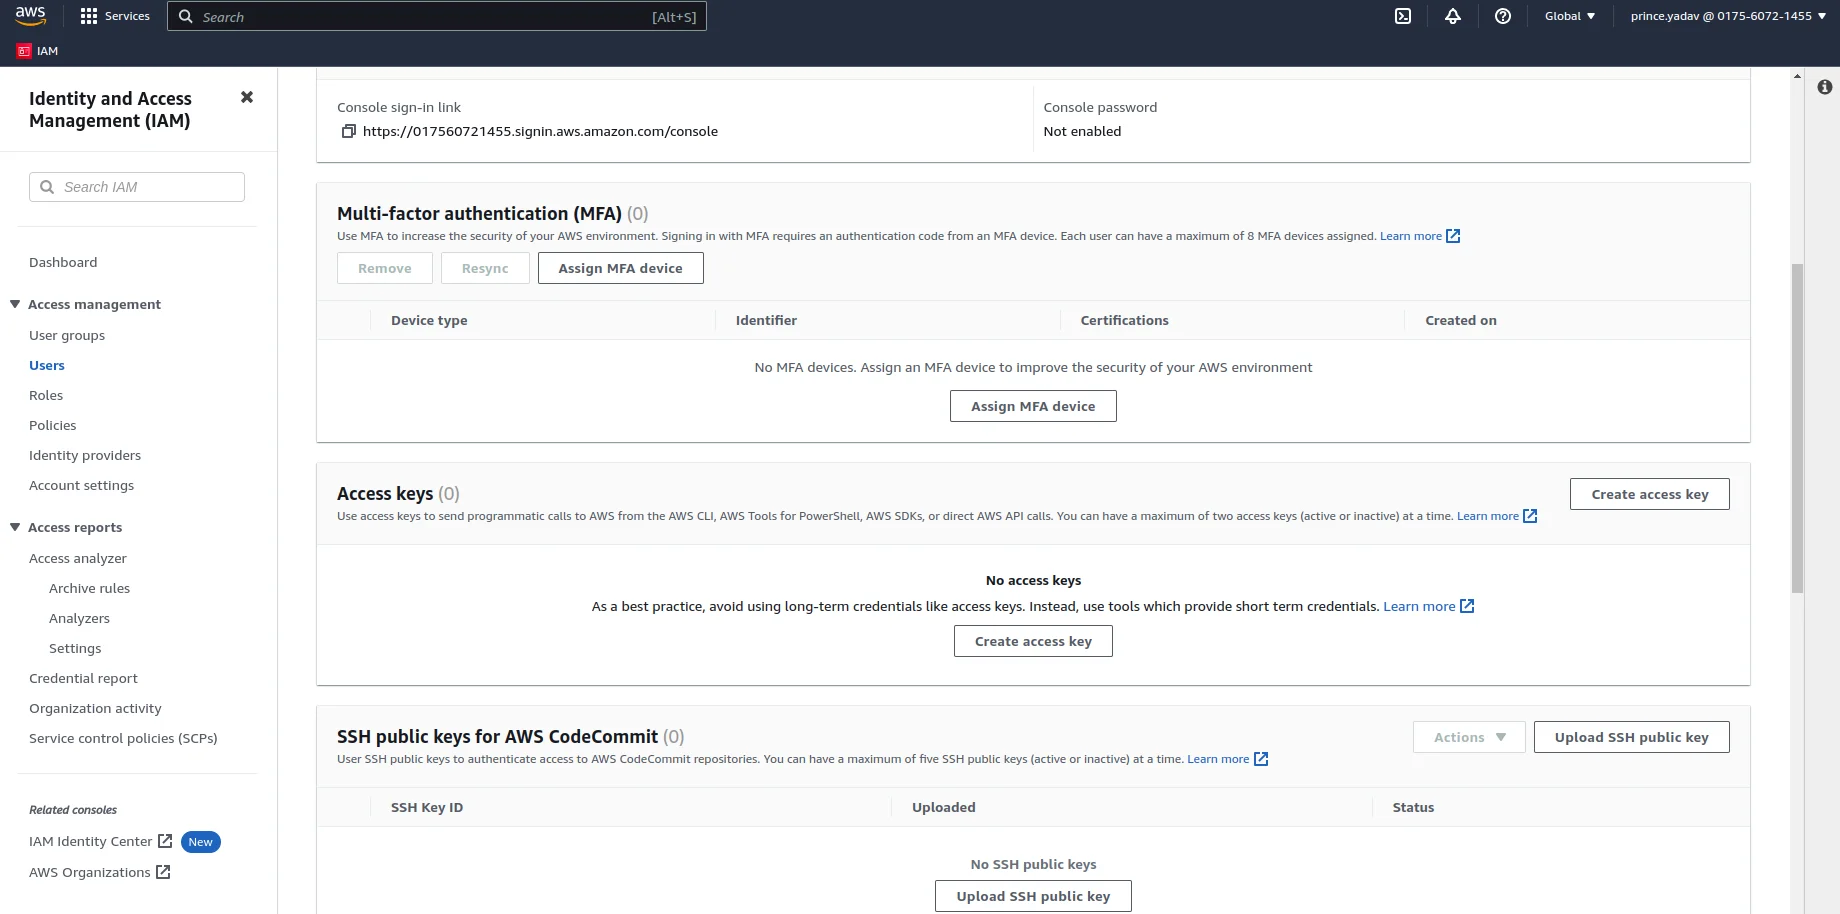 Choose the option **Application running outside AWS** & click on **Next .** Enter a description and click on the **Create access key** button. Now you can copy the **Access keys** & **Secret access key** or download a **CSV** file for the same for future use while connecting with Labellerr
 ## Creating Dataset & Annotation Project at LABELLERR
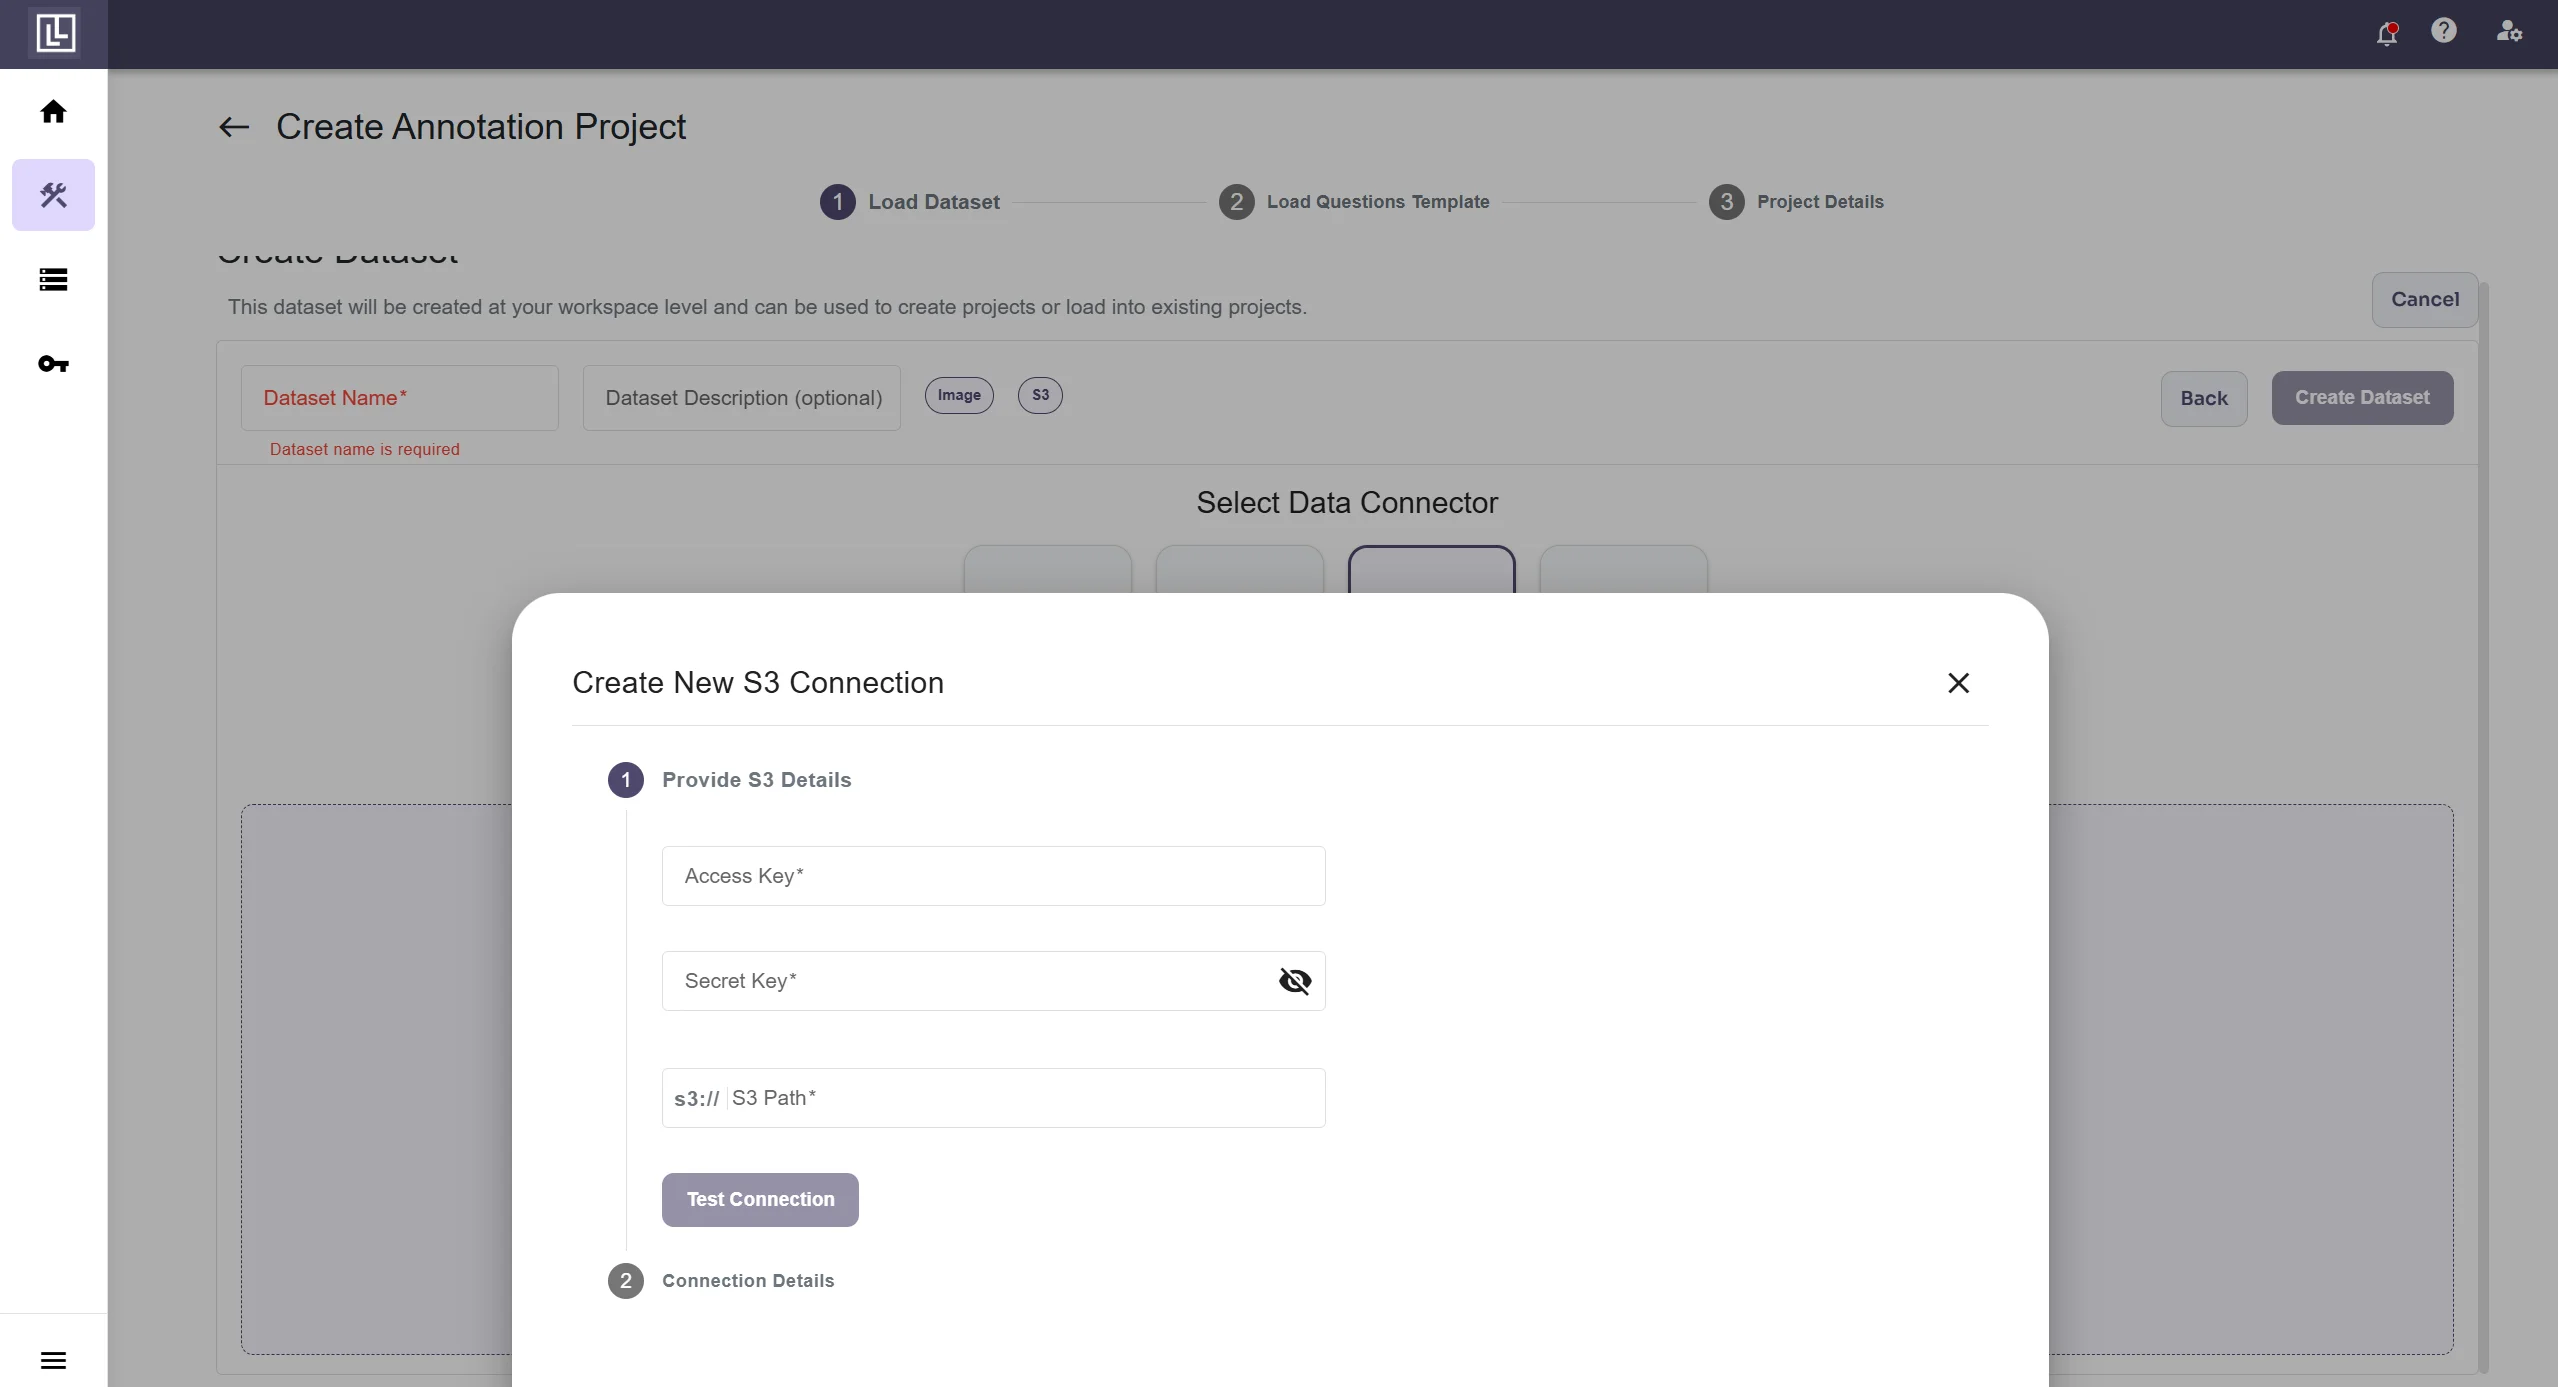
While creating a project dataset **choose Amazon S3** to connect data-source and click on Create new connection button.
## Creating Dataset & Annotation Project at LABELLERR
While creating a project dataset **choose Amazon S3** to connect data-source and click on Create new connection button.
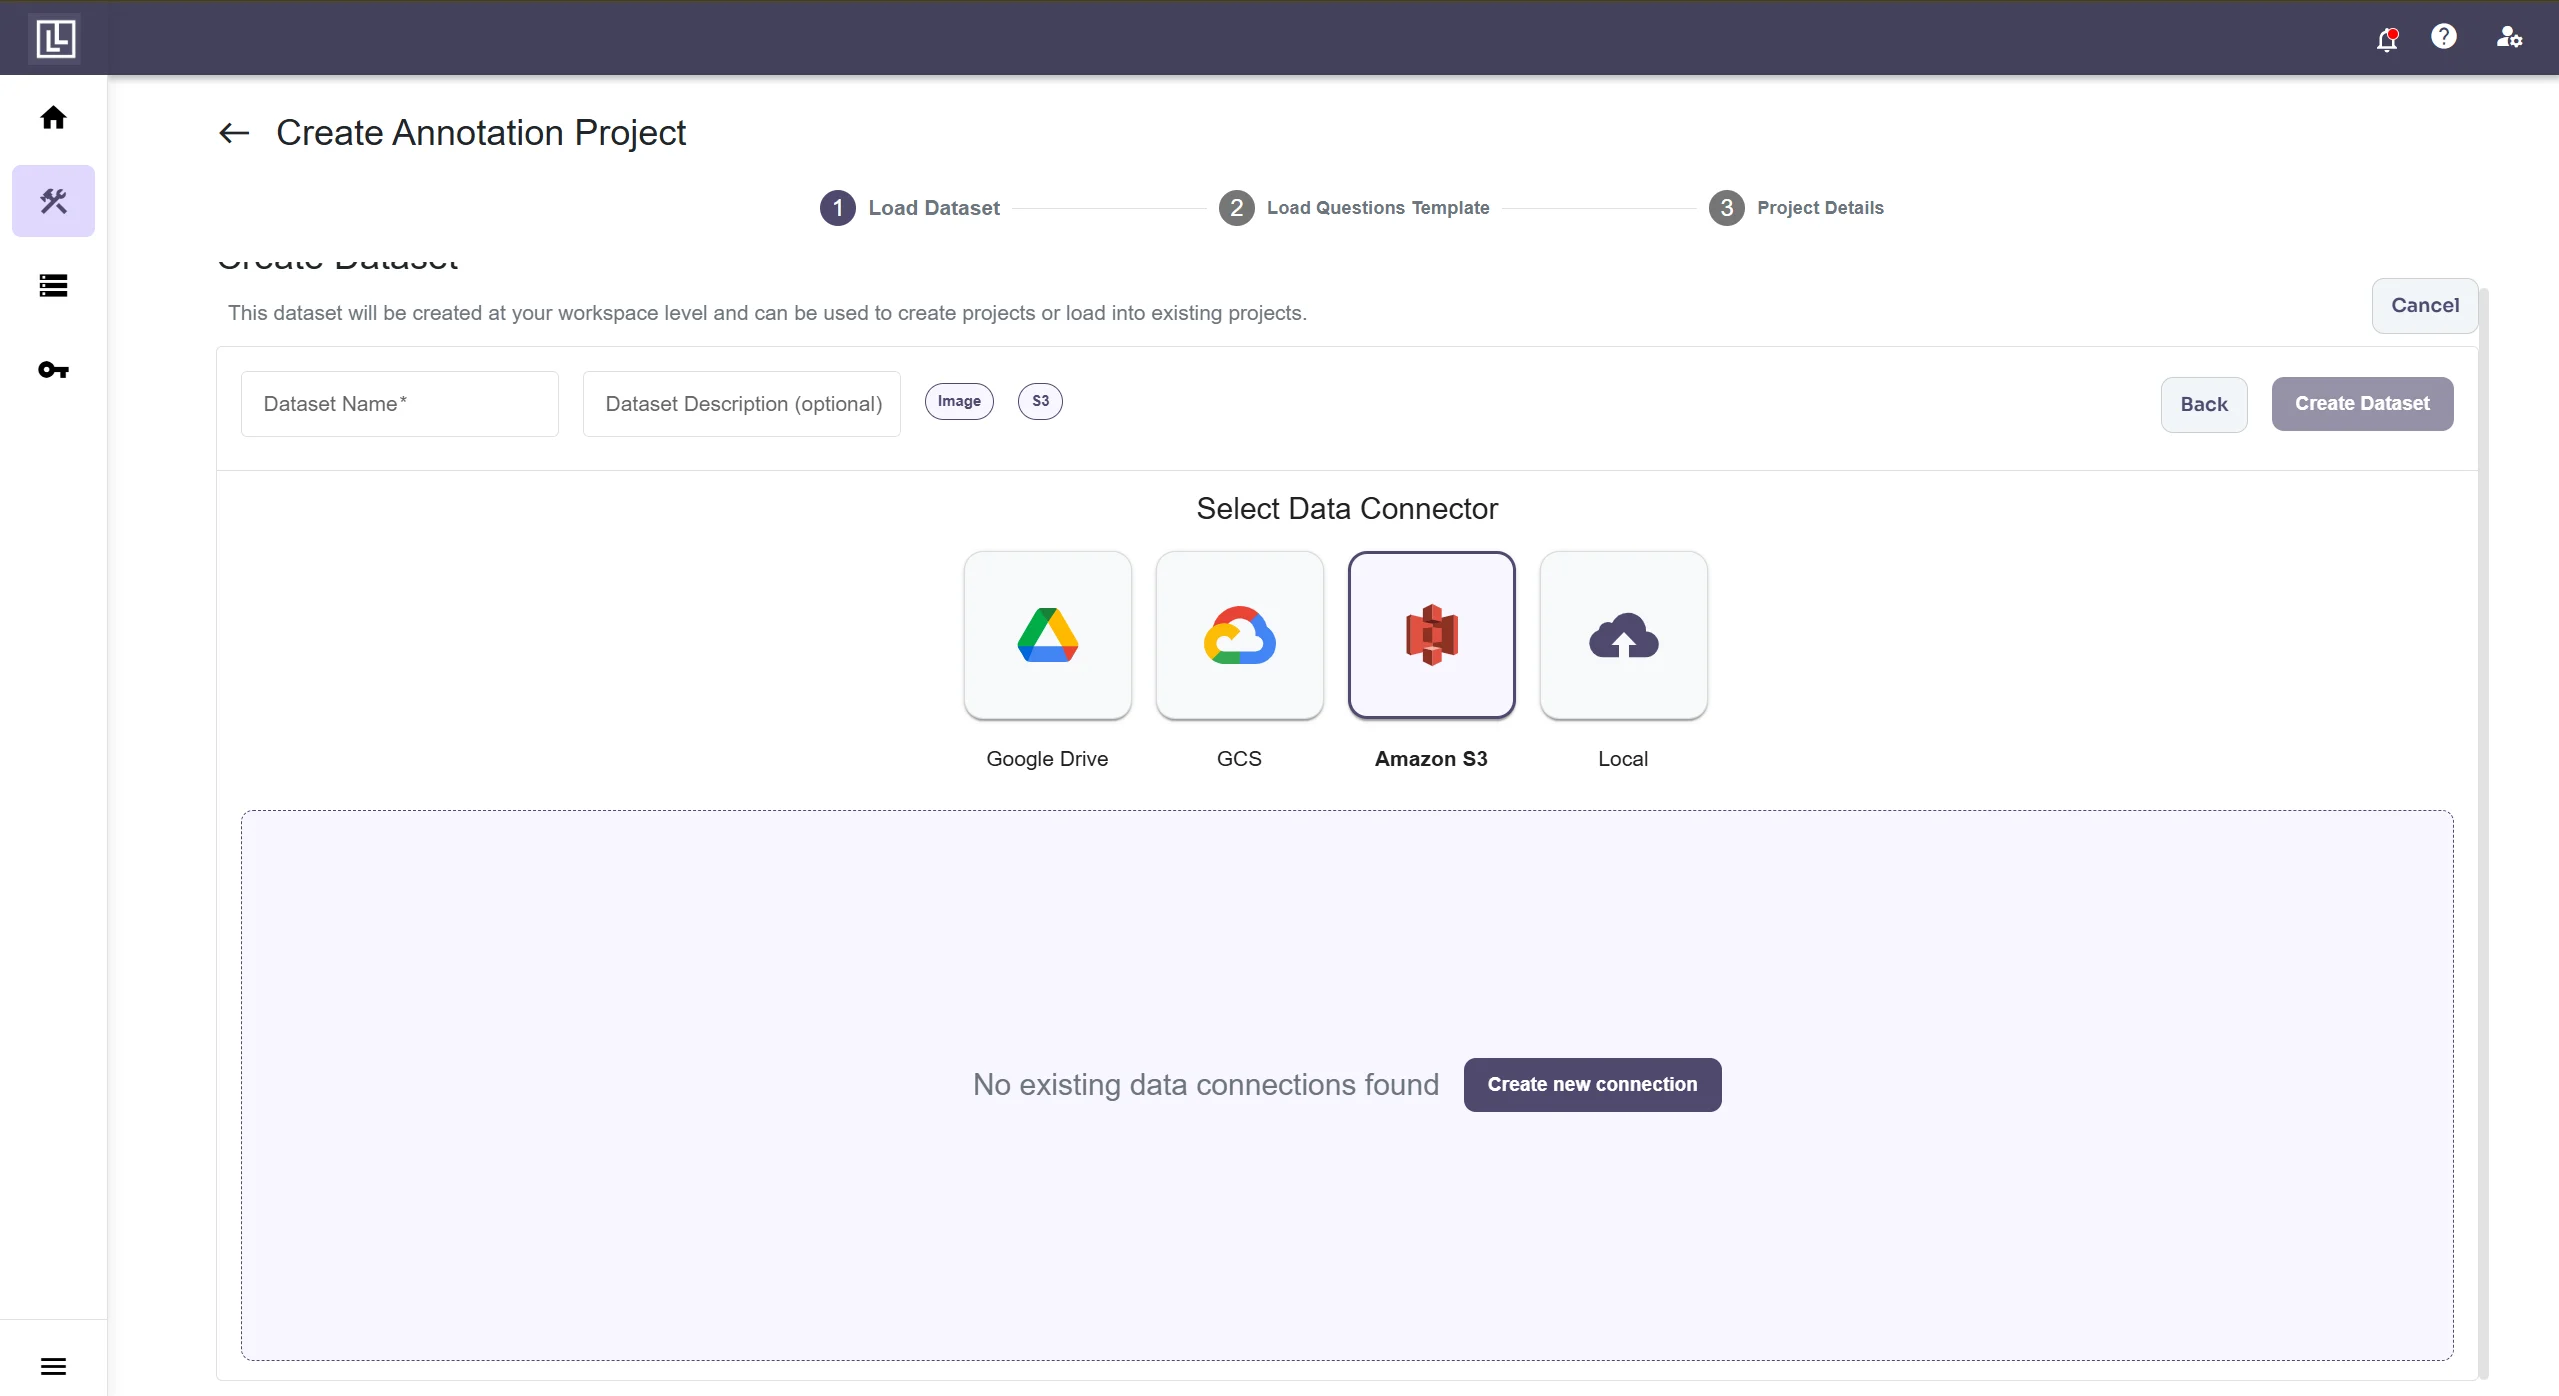 Fill in the details. Fill the **Access key** & **Secret Access Key** generated in previous steps along with **s3 URI.** To find the **s3 URI** go to your bucket and copy the path of the images **folder.** Also remove the **s3:// prefix** from the URL. Now click on **connect** button
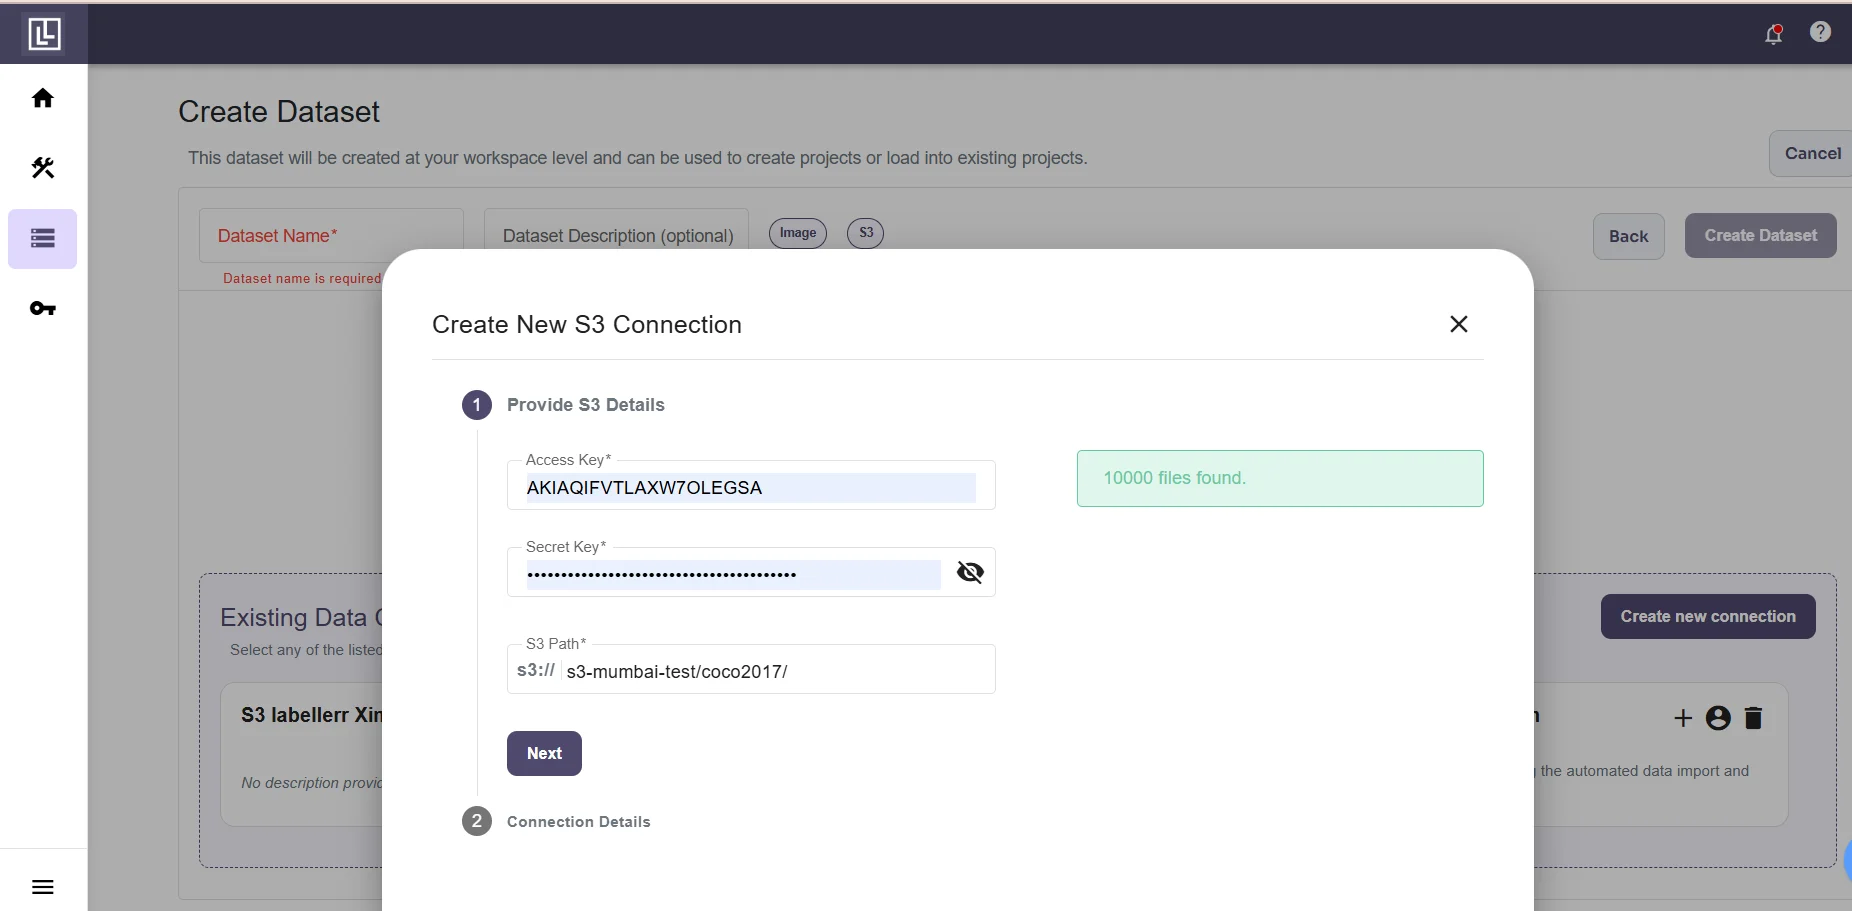
 If you fill in the details correctly you will receive this message.
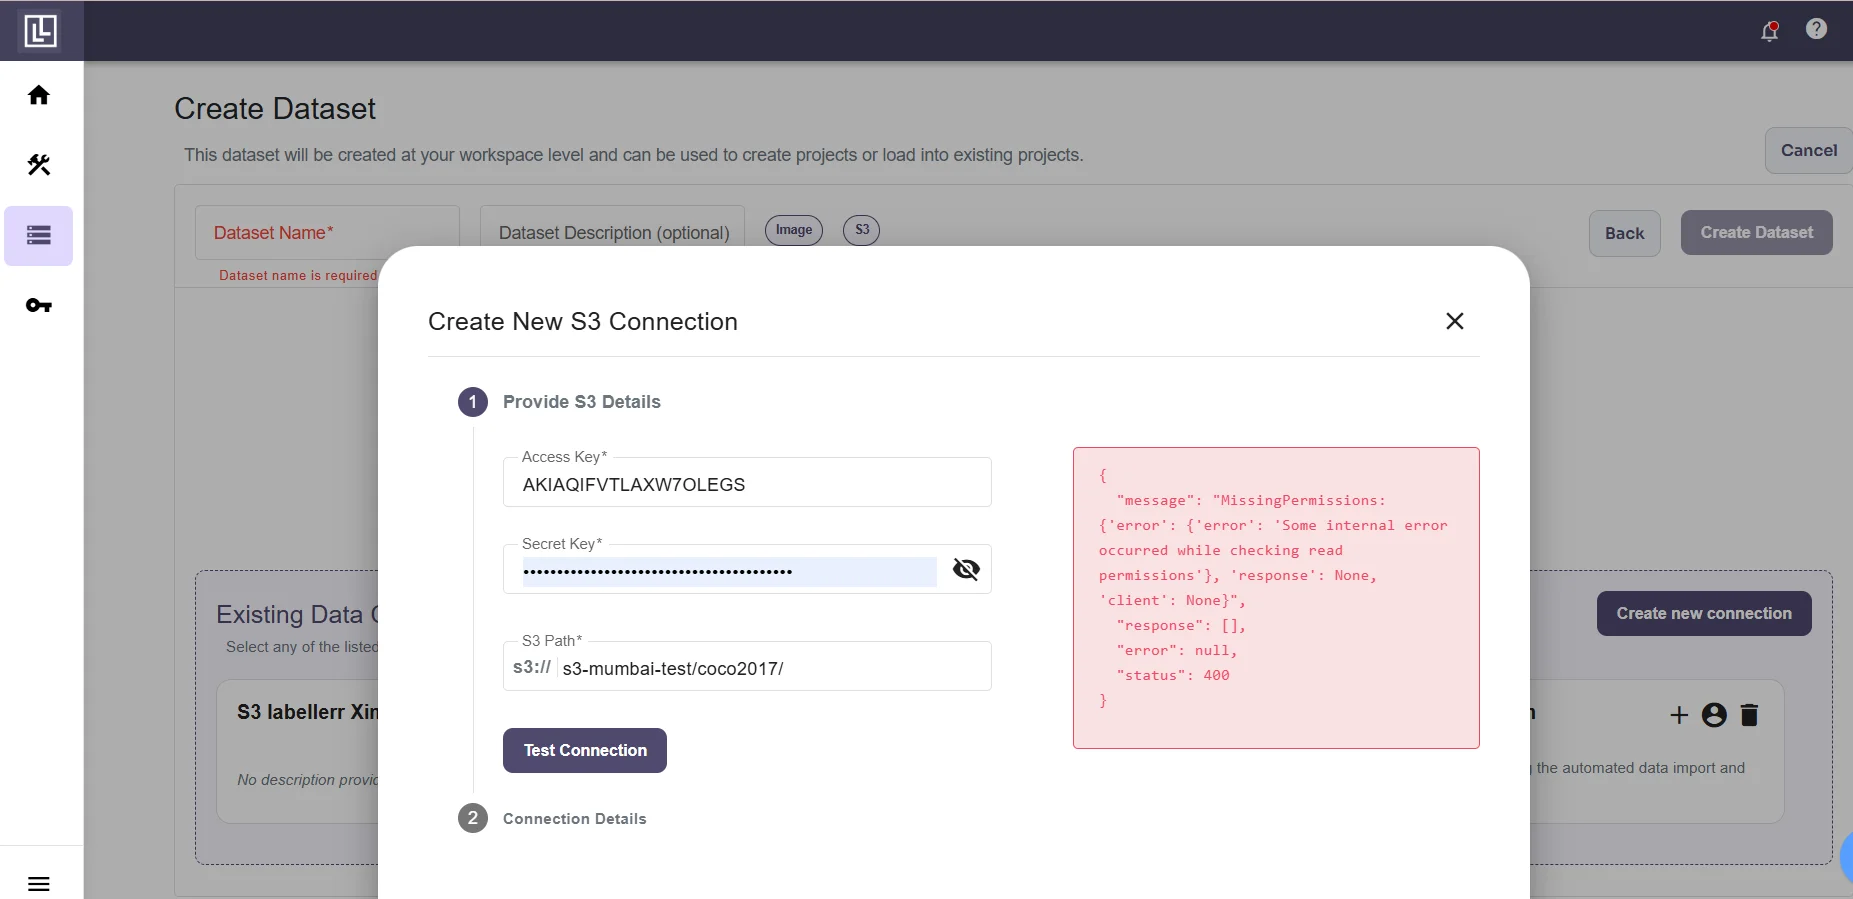
 If you messed up somewhere you will get an error.
 After successfully testing the connection you will be required to fill the **Connection Name** and **Connection Description(Optional).**
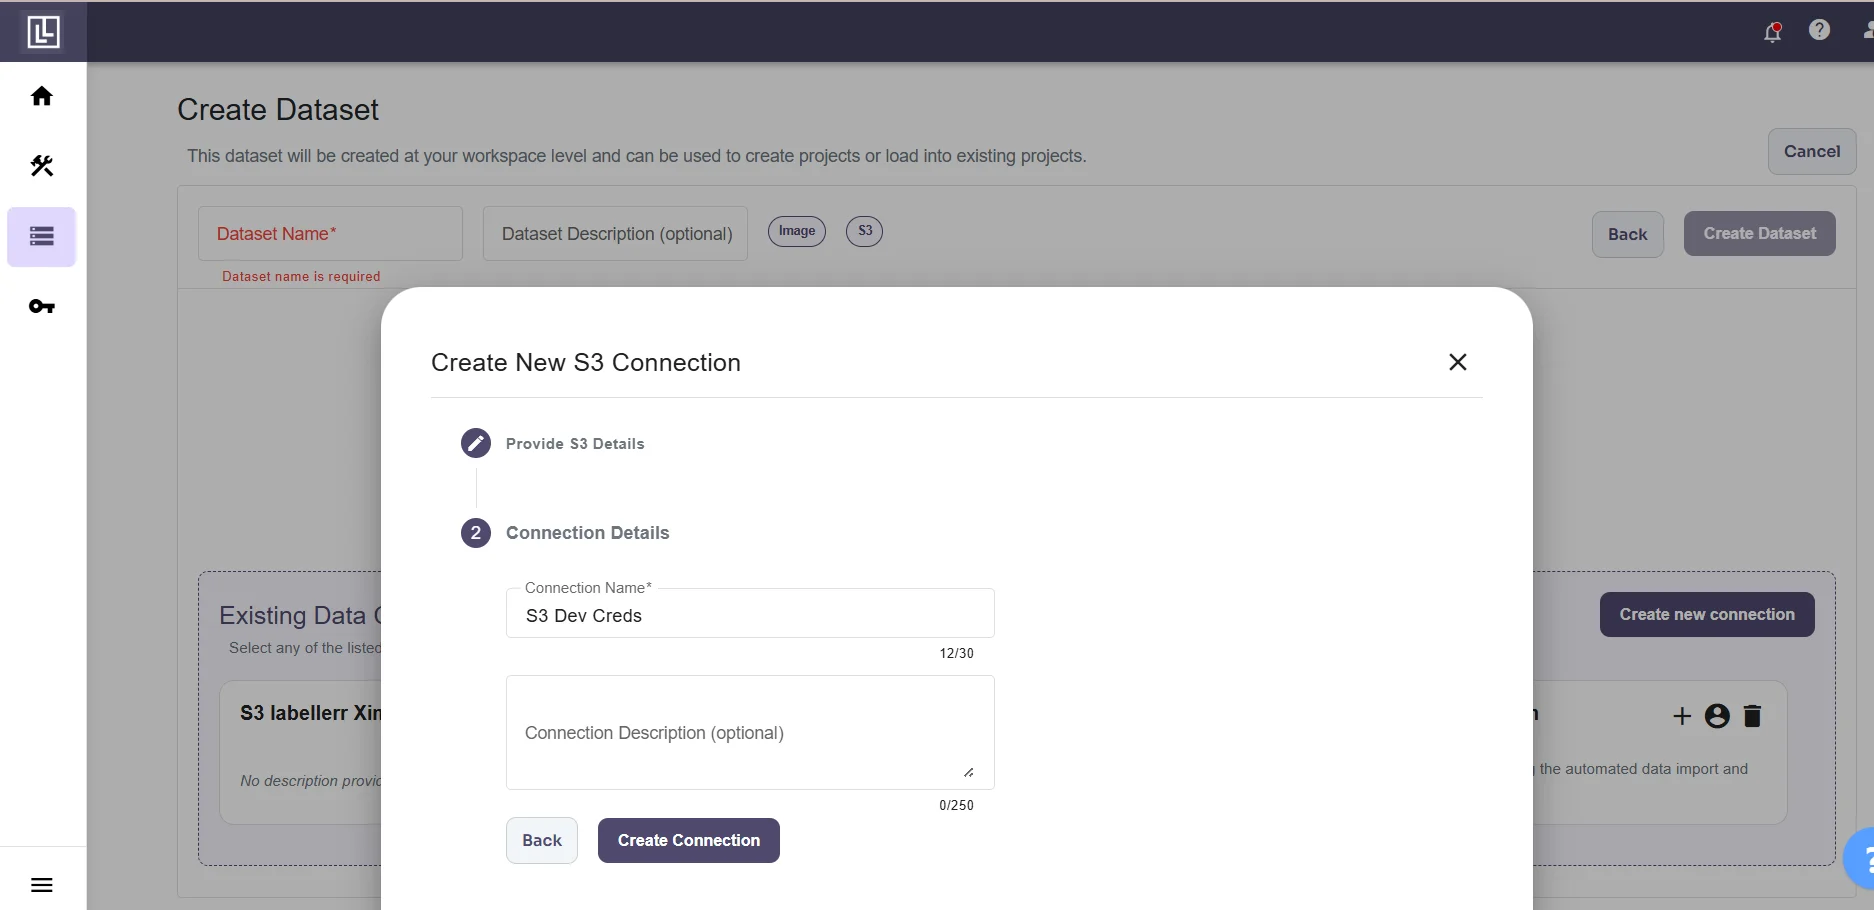 That's it, this is how you can connect AWS S3 with our Labellerr Data Connector. Now you can successfully, Create a Project.
## Troubleshooting
**Symptom:** Dataset appears to create successfully but then shows "Failed" status or status code 500.
**Cause:** The IAM user/connection does not have the required permissions to access the S3 bucket.
**Solution:**
1. Verify the IAM policy is correctly attached to your user
2. Ensure the bucket name in the policy matches your actual bucket
3. Check that the `/*` wildcard is included for object-level permissions
4. Test the connection before creating datasets:
```python theme={"dark"}
from labellerr.core.connectors import LabellerrConnection
from labellerr.core.schemas import ConnectionType, DatasetDataType
connection = LabellerrConnection(client=client, connection_id="your_connection_id")
test_result = connection.test(
path="s3://your-bucket/path/to/data/",
connection_type=ConnectionType._IMPORT,
data_type=DatasetDataType.image
)
```
**Symptom:** Files exist in S3 bucket but dataset shows 0 files.
**Cause:** The connection lacks read permissions (`s3:GetObject`, `s3:ListBucket`) on the bucket.
**Solution:**
1. Verify `s3:GetObject` permission is set on the bucket objects (`arn:aws:s3:::bucket-name/*`)
2. Verify `s3:ListBucket` permission is set on the bucket (`arn:aws:s3:::bucket-name`)
3. Check that the path format is correct: `s3://bucket-name/folder/`
**Symptom:** Connection test returns an error when trying to connect.
**Cause:** Invalid credentials, wrong path format, or insufficient permissions.
**Solution:**
1. Verify your Access Key and Secret Access Key are correct
2. Check the path format: `s3://bucket-name/path/to/folder/`
3. Ensure the IAM user has all required permissions listed above
4. Verify the bucket exists and is in the correct AWS region
**Symptom:** Images don't load in the Labellerr annotation interface due to CORS errors.
**Cause:** Missing CORS configuration on the S3 bucket.
**Solution:**
Either grant `s3:PutBucketCors` permission to allow Labellerr to set CORS automatically, or configure CORS manually on your bucket:
```json theme={"dark"}
[
{
"AllowedHeaders": ["*"],
"AllowedMethods": ["GET", "HEAD"],
"AllowedOrigins": ["*.labellerr.com"],
"ExposeHeaders": [],
"MaxAgeSeconds": 3600
}
]
```
**Symptom:** Export fails with "No files found with the given status" error.
**Cause:** Files have not been moved to the expected workflow stage (review, client\_review, or accepted).
**Solution:**
1. Ensure files have been annotated AND reviewed before exporting
2. Check the `statuses` parameter in your export configuration
3. Valid statuses for export: `review`, `client_review`, `accepted`
**Symptom:** An "Internal server error" appears with a tracking ID.
**Cause:** Usually indicates a server-side issue, often related to permissions.
**Solution:**
1. Note the tracking ID for support reference
2. Check connection permissions are still valid
3. Verify IAM user credentials haven't been rotated or revoked
4. Contact [support@tensormatics.com](mailto:support@tensormatics.com) with the tracking ID
## Related Guides
Set up GCS bucket connection with service account authentication
Learn how to create annotation projects with your connected data
That's it, this is how you can connect AWS S3 with our Labellerr Data Connector. Now you can successfully, Create a Project.
## Troubleshooting
**Symptom:** Dataset appears to create successfully but then shows "Failed" status or status code 500.
**Cause:** The IAM user/connection does not have the required permissions to access the S3 bucket.
**Solution:**
1. Verify the IAM policy is correctly attached to your user
2. Ensure the bucket name in the policy matches your actual bucket
3. Check that the `/*` wildcard is included for object-level permissions
4. Test the connection before creating datasets:
```python theme={"dark"}
from labellerr.core.connectors import LabellerrConnection
from labellerr.core.schemas import ConnectionType, DatasetDataType
connection = LabellerrConnection(client=client, connection_id="your_connection_id")
test_result = connection.test(
path="s3://your-bucket/path/to/data/",
connection_type=ConnectionType._IMPORT,
data_type=DatasetDataType.image
)
```
**Symptom:** Files exist in S3 bucket but dataset shows 0 files.
**Cause:** The connection lacks read permissions (`s3:GetObject`, `s3:ListBucket`) on the bucket.
**Solution:**
1. Verify `s3:GetObject` permission is set on the bucket objects (`arn:aws:s3:::bucket-name/*`)
2. Verify `s3:ListBucket` permission is set on the bucket (`arn:aws:s3:::bucket-name`)
3. Check that the path format is correct: `s3://bucket-name/folder/`
**Symptom:** Connection test returns an error when trying to connect.
**Cause:** Invalid credentials, wrong path format, or insufficient permissions.
**Solution:**
1. Verify your Access Key and Secret Access Key are correct
2. Check the path format: `s3://bucket-name/path/to/folder/`
3. Ensure the IAM user has all required permissions listed above
4. Verify the bucket exists and is in the correct AWS region
**Symptom:** Images don't load in the Labellerr annotation interface due to CORS errors.
**Cause:** Missing CORS configuration on the S3 bucket.
**Solution:**
Either grant `s3:PutBucketCors` permission to allow Labellerr to set CORS automatically, or configure CORS manually on your bucket:
```json theme={"dark"}
[
{
"AllowedHeaders": ["*"],
"AllowedMethods": ["GET", "HEAD"],
"AllowedOrigins": ["*.labellerr.com"],
"ExposeHeaders": [],
"MaxAgeSeconds": 3600
}
]
```
**Symptom:** Export fails with "No files found with the given status" error.
**Cause:** Files have not been moved to the expected workflow stage (review, client\_review, or accepted).
**Solution:**
1. Ensure files have been annotated AND reviewed before exporting
2. Check the `statuses` parameter in your export configuration
3. Valid statuses for export: `review`, `client_review`, `accepted`
**Symptom:** An "Internal server error" appears with a tracking ID.
**Cause:** Usually indicates a server-side issue, often related to permissions.
**Solution:**
1. Note the tracking ID for support reference
2. Check connection permissions are still valid
3. Verify IAM user credentials haven't been rotated or revoked
4. Contact [support@tensormatics.com](mailto:support@tensormatics.com) with the tracking ID
## Related Guides
Set up GCS bucket connection with service account authentication
Learn how to create annotation projects with your connected data